Homemade Marshmallows

Photo Credit: Heather Katsoulis (hlkljgk/Flickr)
Whether you prefer them toasted over a campfire, bobbing in a cup of hot chocolate, or roasted over a bed of sweet potatoes, marshmallows are an ooey-gooey fluffy treat that just finds a way warm the cockles of your heart.
Marshmallows, like other well-known aerated confections – think mousses, ice cream, meringues – are essentially made of four basic components: sugar, water, air, and a hydrocolloid. Hydrocolloids, often called “food gums” are polysaccharides, or typically large-branching proteins, that form thick gels when they interact with water. [1]
Their ability to bind to water molecules makes them hydrophilic (or “water-loving”), and their ability to remain suspended and dispersed evenly in the water (without settling to the bottom) makes the substance a colloid. Thus, food gums are hydrophilic colloids, or hydrocolloids.

Photo Credit: Daniel Campagna (Chefpedia)
Hydrocolloids are added to many foods we eat – as thickening agents in pie fillings or gravies, gelling agents in puddings and jams, foam stabilizers in beer and meringues, film formers in sausage casings, emulsifiers in salad dressing, and even fat replacers in frostings and muffins. Common examples of hydrocolloids are starch, xanthan gum, locust bean gum, alginate, pectin, carrageenan, and agar, which all influence the texture and mechanical stability of many foods. [1][2]
In marshmallows, the hydrocolloid responsible for the chewy, bouncy texture we know and love is gelatin. While gelatin is one of the most popular commercial hydrocolloids, it is definitely not the most glamorous. Gelatin is made of collagen, which is the structural protein derived from animal skin, connective tissue, and bones. In fact, mainstream gelatin is usually obtained from pigskin, cattle bones, and cattle hide. [3] Gelatin is unique because not only does it function as a foam stabilizer for the marshmallows [4], but when it is mixed with water, gelatin forms a thermally-reversible gel. These gelatin gels have a melting temperature just below body temperature (< 35°C or 95 °F), so the gel product literally melts in your mouth and releases intense flavor immediately as it dissolves, which is a difficult quality to replicate with other hydrocolloids. [3]
Gelatin makes marshmallows chewy by forming a tangled 3-D network of polymer chains. Once gelatin is dissolved in warm water (dubbed the “blooming stage”), it forms a dispersion, which results in a cross-linking of its helix-shaped chains. The linkages in the gelatin protein network, called “junction zones” trap air in the marshmallow mixture and immobilize the water molecules in the network . The result? The famously spongy structure of marshmallows! [1] This is why the omission of gelatin from a homemade marshmallow recipe will result in marshmallow crème, since there is no gelatin network to trap the water and air bubbles.
And for the gelatin-averse, worry not! There are indeed many hydrocolloid alternatives to gelatin. However, since gelatin has so many different functions (gelling agent, emulsifier, stabilizer, thickener, etc.), its alternatives are not universal. Rather, substitutes are specific to each specific food application. In our case, some have suggested pectin – a polysaccharide from the cell walls of plants – as the ideal replacement for gelatin in marshmallows [1].

Agar agar is a commonly used vegetarian alternative for jellies.
Photo Credit: I Believe I Can Fry (johnnystiletto/Flickr)
Pectin, carrageenan (a polysaccharide from red seaweeds), or combinations of both can replicate the elastic texture and intense flavor release that gelatin provides for marshmallows. However, since the melting points of both pectin and carrageenan are not the same as the melting point of gelatin – which, as you recall, is slightly below body temperature, marshmallows made with pectin or carrageenan don’t have the quite the same “melt-in-your-mouth” sensation. [1]

* Note: Carrageenan gels are unique in that their melting temperature can be modified, depending on the solution concentration of the carrageenan and the presence of cations, so its melting temperature ranges from 40°C (104°F) and 70°C (158°F).
As you can see, none of the gelatin alternatives have the appropriate melting temperatures to replicate gelatin’s melt-in-your-mouth sensation. However, this does prove advantageous in the fact that they can last longer on hot days or in hot, tropical climates and they do not require refrigeration to set.
No matter what you prefer for as a hydrocolloid, pillowy marshmallows can made with the same basic recipe:

Photo Credit: Joy (joyosity/Flickr)
Ingredients
For the bloom:
3 tablespoons (typically 3 packets) unflavored gelatin powder
1/2 cup cold water
*Vegan Substitution: 2 ½ tablespoons agar agar + ½ cup and 2 tablespoons water
Alternatively, this vegan marshmallow recipe is worth checking out:
For the marshmallows:
3/4 cup water
1 1/2 cups granulated sugar
1 1/4 cup sugar cane syrup or corn syrup
Pinch of salt
For the marshmallow coating:
1 1/2 cups powdered sugar
1/2 cup cornstarch
non-stick cooking spray
Equipment
Bowls and measuring cups
Fork or small whisk
9×13 baking pan or other flat container
4-quart saucepan (slightly larger or smaller is ok)
Pastry brush (optional)
Candy thermometer
Stand mixer with a wire whisk attachment
Stiff spatula or spoon (as opposed to a rubbery, flexible one)
Sharp knife or pizza wheel
Instructions
- Prepare pans and equipment: Spray the baking pan with cooking spray. Use a paper towel to wipe the pan and make sure there’s a thin film on every surface, corner, and side. Set it near your stand mixer, along with the kitchen towel and spatula. Fit the stand mixer with the whisk attachment.
- Bloom the gelatin/agar: Measure the gelatin or agar into the bowl of the stand mixer. Combine 1/2 cup cold water in a measuring cup and pour this over the gelatin or agar while whisking gently with a fork. Continue stirring until the gelatin or agar has dissolved or reached the consistency of apple sauce and there are no more large lumps. Set the bowl back in your standing mixer. (Alternatively, you can bloom the gelatin or agar in a small cup and transfer it to the stand mixer.)
* NOTE: You can add about 1 tablespoon of powdered flavorings to your hydrocolloid while it is blooming in the water.
Photo Credit: Joy (joyosity/Flickr)
- Combine the ingredients for the syrup: Pour 3/4 cup water into the 4-quart saucepan. Pour the sugar, corn syrup, and salt on top. Do not stir.
- Bring the sugar syrup to a boil: Place the pan over medium-high heat and bring it to a full, rapid boil — all of the liquid should be boiling. As it is coming to a bowl, occasionally dip a pastry brush in water and brush down the sides of the pot. This prevents sugar crystals from falling into the liquid, which can cause the syrup to crystallize. If you don’t have a pastry brush, cover the pan for 2 minutes once the mixture is at a boil so the steam can wash the sides.
Do not stir the sugar once it has come to a boil or it may crystallize! - Boil the syrup to 247°F to 250°F: Clip a candy thermometer to the side of the sauce pan and continue boiling until the sugar mixture reaches 247°F to 250°F. Take the pan off the heat and remove the thermometer.
- Whisk the hot syrup into the gelatin / agar: Turn on your mixer to medium speed. Carefully pour the hot sugar syrup down the side of the bowl into the gelatin or agar. The mixture may foam up — just go slowly and carefully.
- Increase speed and continue beating: When all the syrup has been added, cover the bowl with a clean kitchen towel and increase the speed to high (the cloth protects from splatters — the cloth can be removed after the marshmallows have started to thicken).

Photo Credit: Joy (joyosity/Flickr)
- Beat marshmallows until thick and glossy: Whip for about 10 minutes. At first, the liquid will be very clear and frothy. Around 3 minutes, the liquid will start looking opaque, white, and creamy, and the bowl will be very warm to the touch. Around 5 minutes, the marshmallow will start to increase in volume. You’ll see thin, sticky strands between the whisk and the side of the bowl; these strands will start to thicken into ropes over the next 5 minutes. The marshmallow may not change visually in the last few minutes, but continue beating for the full 10 minutes. When you finish beating and stop the mixer, it will resemble soft-serve vanilla ice cream.
* NOTE: Add 1- 2 tablespoons of liquid flavorings during the last couple minutes of the beating process. (See Ideas Section below.)
- Immediately transfer to the baking pan: With the mixer running on medium, slowly lift (or lower, depending on your model) the whisk out of the bowl so it spins off as much marshmallow as possible. Using your stiff spatula, scrape the as much of the thick and sticky marshmallow mixture into the pan as you can.
* NOTE: If you want mini marshmallows, after mixing, immediately put the mixture in a piping bag and pipe out your mini marshmallows in the size and shape of your choice.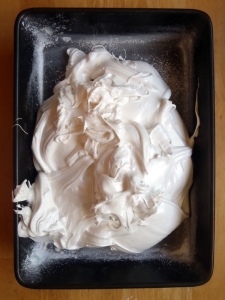
Photo Credit: Joy (joyosity/Flickr)
- Let the marshmallows set for 6 to 24 hours: Spray your hands lightly with cooking oil and smooth the top of the marshmallow to make it as even as possible. Let the mixture sit uncovered and at room temperature for 6 to 24 hours to set.
- Prepare the marshmallow coating: Combine the powdered sugar and cornstarch in a bowl.
- Remove the marshmallows from the pan: Sprinkle the top of the cured marshmallows with some of the powdered sugar mix and smooth it with your hand. Flip the block of marshmallows out onto your work surface. Use a spatula to pry them out of the pan if necessary. Sprinkle more powdered sugar mixture over the top of the marshmallow block.
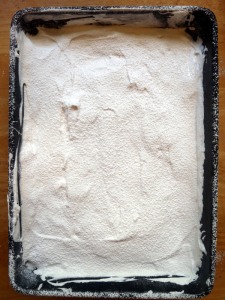
Photo Credit: Joy (joyosity/Flickr)
- Cut the marshmallows: Using a sharp knife or pizza wheel, cut the marshmallows into squares. It helps to dip your knife in water every few cuts. (You can also cut the marshmallows with cookie cutters.)
- Coat each square with powdered sugar mix: Toss each square in the powdered sugar mix so all the sides are evenly coated.

Photo Credit: Joy (joyosity/Flickr)
- Store the marshmallows: Marshmallows will keep in an airtight container at room temperature for several weeks. Leftover marshmallow coating can be stored in a sealed container indefinitely.


Ideas:
- Add Flavorings: You can add about a tablespoon of either powdered or liquid flavorings/food colorings to the marshmallows at Step 2 or Step 8, respectively, in the recipe.
- Sweet Marshmallows
– classic: vanilla extract, almond extract, cocoa powder
– floral: rose water, orange blossom water
– spiced: cinnamon, pumpkin spice, cardamom, nutmeg, chai tea, peppermint
– fruity: passion fruit, strawberry, mango, lemon juices - Savory Marshmallows
– A great base for savory marshmallows: PopSci:Sechuan Peppercorn Marshmallow
– garlic salt and pepper
– pesto (I’m imagining a pillowy caramelized pesto-marshmallow roasted on top of a pizza!)
– hot sauce - Add citric acid or cream of tartar to stabilize the inverted sugars in your recipe and prevent them from crystallizing, essentially ensuring that your marshmallows remain fluffy and chewy.
- Add your sugar syrup into whipped egg whites to incorporate extra air volume and structure for spongier, pillowy marshmallows.
- DIY Lucky Charms: You can make your own dehydrated marshmallows, similar to the ones found in breakfast cereals (but without all the suspicious additives) by evaporating the water from the sugar solution in your homemade marshmallows. Various methods are described here.
Recipe adapted from
References Cited
- Saha, D., Bhattacharya, S. Hydrocolloids as thickening and gelling agents in food: a critical review. Journal of Food Science and Technology. December 2010; 47(6): 587-597.
- “Gum“. Food @ OSU.
- Karim, A. A., Bhat, R. Gelatin alternatives for the food inudustry: recent developments, challenges and prospects. Trends in Food Science & Technology. December 2008; 19(12): 644-656.
- Gelatin. Gelatin Food Science. 14 Dec. 1998.
 About the author: Eunice Liu is studying Neuroscience and Linguistics at UCLA. She attributes her love of food science to an obsession with watching bread rise in the oven.