Chia Seed Apple Pie

Continuing our Science of Pie adventure, we’ve invited Elsbeth Sites of Team Chia to share her pie science project, which examines the use of a very unconventional thickener to tune the viscosity of pie filling.  Elsbeth is an undergraduate student of physiological sciences at UCLA who is passionate about food and writing, especially writing about food.

Have you ever baked a lovely pie, sliced it and placed it gently on your best dessert plates, then watched in despair as the filling fled its warm crust and bled all over the dish? This common and unfortunate experience led our team to investigate the viscosity of pie filling. We hoped to discover a way to produce a pie of perfect viscosity that upon slicing, would not spread over the plate too far, nor be too gelatinous. Most pies contain cornstarch to thicken their fillings. To make our project unique and to put a modern and healthy twist on our pie, we replaced starch with the trendy new superfood: chia seeds.

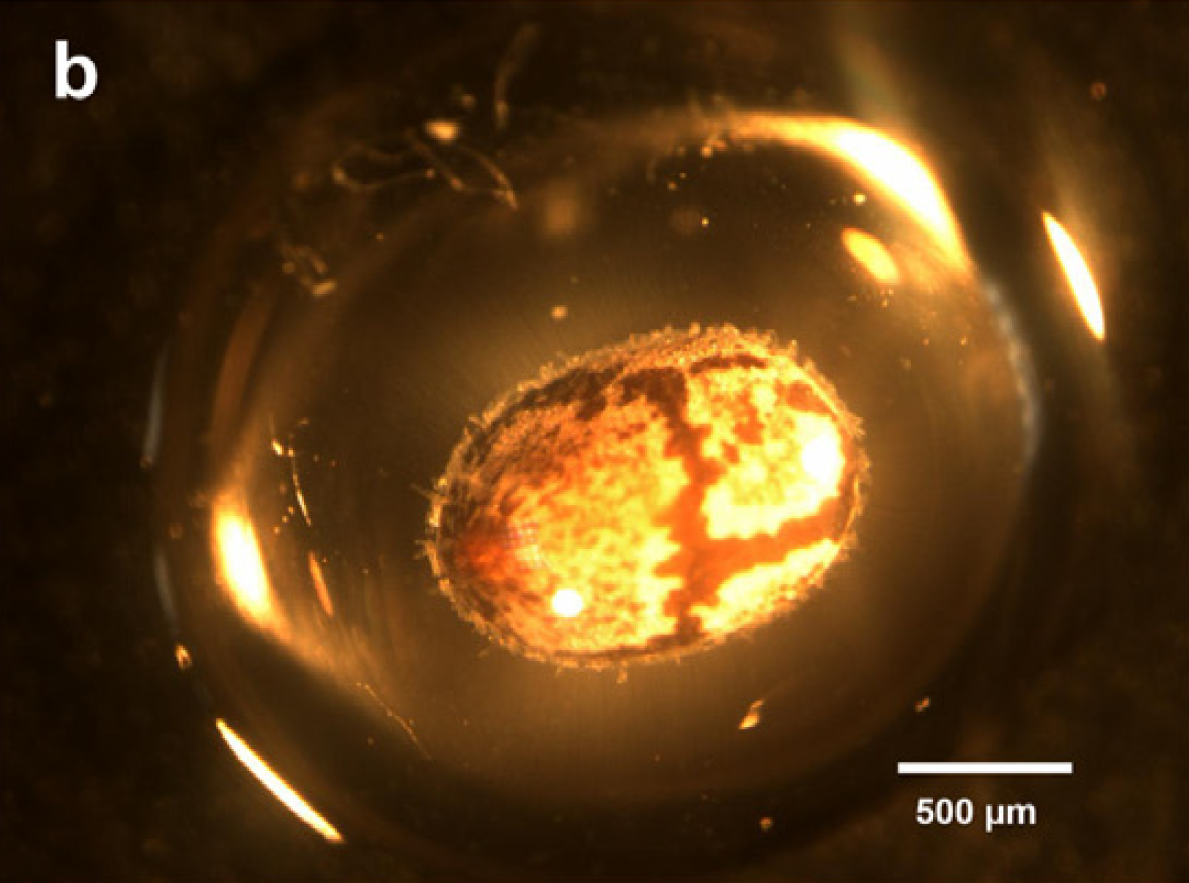
The outside of the chia seed contains large fibrous molecules called polysaccharides. When the seed is wet, these molecules are exuded from the seed and trap liquid. This allows the seed to hold approximately nine times its own weight in water, causing a bead of gel to form around the seed [1].

Chia seed hydration. Chia seeds can absorb approximately nine times their weight in water. Water absorption creates a mucilaginous gel around the seed. Figures are from [1].

With this knowledge of the chia seed, we posed these questions:

  • How do we create a pie that does not bleed across a plate when sliced while not being overly gelatinous?
  • Can chia seeds be used to increase the viscosity of our pie filling?
  • At what concentration should the seeds be added to the pie to get an ideal viscosity without compromising taste or texture?
Measuring viscosity with the “line spread” test. The line spread test measures the distance a liquid or semiliquid flows across a flat surface. We used a hard, clear, plastic surface marked with concentric circles spread 0.5 cm apart across a 7.5 cm radius. Lines originating in the circles’ center divide the circles into four quadrants. The longest distance traveled by the filling in each quadrant was averaged to find the mean distance that the filling spread.

We defined our perfect filling to be one that spread slightly when placed on a flat surface without remaining too gelatinous and not spreading at all. A traditional apple pie filling prepared with cornstarch spread 5.6 centimeters in 60 seconds. Finding the right concentration of seeds to add was a tedious process, and the heat at which the pie was baked and served greatly affected the pie’s viscosity. As shown in the figure above, our control filling with no thickening agent spread on average 5.9 centimeters in 60 seconds—clearly too runny. The filling to which we added 0.5 teaspoons of chia seeds spread 5.5 centimeters. By evaluating these spread distances and tasting each filling, we agreed that the filling with only 0.5 teaspoons seeds yielded the best viscosity and palatability. Using more seeds than this overpowered the spices in the filling, making the pie taste nutty and giving it a slimy mouthfeel.

Our experiment was successful in that we answered our original questions:

  • Chia seeds can indeed be used to tune the viscosity of apple pie filling.
  • To produce an apple pie of optimal viscosity, replace cornstarch with 0.5 tsp chia seeds per ½ cup of filling. While our pie might appeal to the culinarily curious or health savvy, those who prefer a classic pie may find the seeds of the pie annoying, or might miss the texture that more traditional thickeners like cornstarch or flour provide the filling.

If a seedy apple pie up your alley, here is Team Chia’s recipe for Chia Seed Apple Pie. The truly adventurous might even try using chia seeds in a berry pie where thickening agents are more crucial and tiny seeds are less noticeable. If you do try another variation of a chia seed pie at home, let us know how it goes in the comments below!


Pie Crust
Adapted from Everyday Food: Our Best Pie Crust

2 1/2 cups all-purpose flour, plus more for rolling dough
1 tsp salt
1 tsp sugar
16 tbsp (2 sticks) cold unsalted butter, cut into pieces
4 tbsp ice water, plus 2 more if needed

In a food processor, pulse flour, salt, and sugar several times to combine. Add butter. Pulse until mixture resembles coarse meal, with just a few pea-size pieces remaining.

Sprinkle with 4 tablespoons ice water. Pulse until dough is crumbly but holds together when squeezed with fingers (if needed, add up to 2 tablespoons more ice water, 1 tablespoon at a time). Do not over-process.

Turn dough out onto a work surface; form dough into two 3/4-inch-thick disks. Wrap both separately and tightly in plastic, and refrigerate until firm, at least 1 hour.


Pie Filling and Assembly

5 Granny Smith apples, sliced
3/4 cup granulated sugar
2 1/2 tsp chia seeds
1/2 tsp ground cinnamon
1/8 tsp ground nutmeg
1/2 cup cold water
3/4 cup apple juice

Preheat oven to 350 degrees.

Wash, peel, and core apples. Cut apples into 1/4- to 1/2-inch slices and place in cold water.

Combine sugar, chia seeds, and spices in a large pot with water and apple juice. Stir and cook on medium high heat until mixture thickens and begins to bubble. Boil for 1 minute, stirring constantly. Fold in apple slices immediately and remove from heat.

To assemble pie, roll dough into 2 14-insh rounds. Fit the first crust into the bottom of a 9-inch pie plate. Spoon filling into the pie dish. Cover the pie with the second crust, trimming the overhang to about 1 inch. Press upper and lower crust edges together and flute as desired. Cut steam slits in the center of the top crust.

Bake for 20 minutes at 350 degrees or until crust is golden brown.


References Cited

  1. Muñoz LA, Cobos A, Diaz O, Aguilera JM (2012) Chia seeds: Microstructure, mucilage extraction and hydration. J Food Eng 108: 216–224. doi:10.1016/j.jfoodeng.2011.06.037.

Boozy Apple Pie

On foraging for local ingredients in your college dormitory…

Our Judge’s Favorite winner of the 2013 Science of Pie event showed how beer and vodka affect pie crust color and texture. But they weren’t the only students who experimented with alcohol in their pies. Two other teams—Team Super Rum and the Beam Team—also used alcohol to create flaky, tender crusts. The Beam Team even added Kentucky bourbon whiskey (Jim Beam, of course) to their pie filling for an extra punch of flavor.

So why all the alcohol? According to the Beam Team:

“Our group was inspired by Alex Atala’s process of going out into the Amazon Forest and finding local plants to use as ingredients. As college students, we decided that our ‘native’ ingredient is alcohol since it is easily found in abundant quantities all around us, so we used our two favorite types of hard alcohol: whiskey and vodka.”

There’s another (more scientific) reason for boozing up a pie crust: alcohol creates a more tender, flaky crust than can be easily achieved with water alone. This happens because alcohol and water have very different effects on the formation of springy gluten networks in pie dough.

Gluten develops when two wheat proteins in flour, glutenin and gliadin, are mixed with water. Because parts of these proteins do not like to interact with water, the proteins begin to stick to each other much in the same way oil droplets come together when suspended in water. As a flour-water dough is mixed, the glutenin and gliadin molecules interact to form an extensive elastic network [1].

Gluten development during dough formation. Scanning electron micrographs of gluten networks during early (A), middle (B), and late (C) stages of dough mixing [2]. The development of these gluten networks requires water.

While gluten networks are great for chewy bread dough, they are less than ideal for flaky, tender pie crust. An ideal pie dough has as just enough gluten to hold everything in the dough together. And while gluten development can be minimized by adding only scant amounts of water and handling the dough as little as possible, this is easier said than done.

A more practical solution is to replace some of the water with a liquid that does not promote gluten formation. Unlike water, alcohol inhibits gluten formation. By interacting with the gluten proteins, alcohol molecules limit their ability to stick to each other and form springy networks [1]. Using alcohol in the place of water allows more liquid to be added to the dough while still restricting gluten formation. This results in a softer, more pliable dough that becomes tender and flaky when baked.

TeamSuperRum

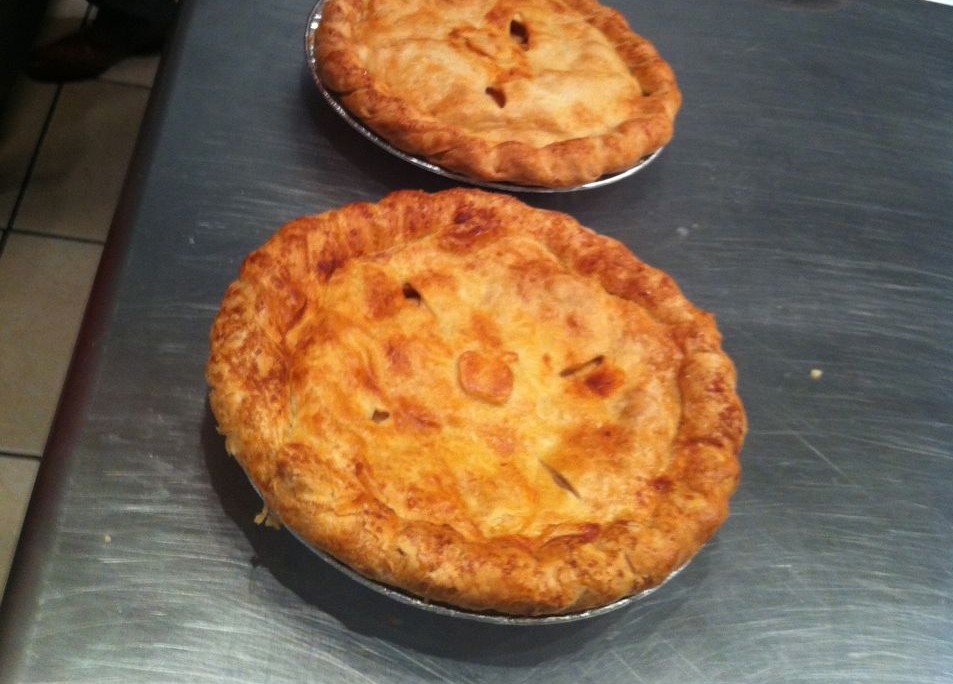
Team Super Rum serves their pie and presents their work at the Science of Pie even (left). Test pies made with rum pie crust (top right) or bourbon apple filling (bottom right).

Like the recipe below, the Beam Team paired a vodka pie crust with a decadent bourbon and apple filling. Although vodka is typically used for its subtle flavor, any type of alcohol will prevent gluten formation. As their name suggests, Team Super Rum used rum instead of vodka to create a flaky and uniquely flavored crust. And we bet there are many more delicious possibilities in the realm of alcohol-based pie crusts. If you try this recipe with something other than vodka, share your new pie crust concoction with us in the comments below!


Foolproof Vodka Pie Crust

Cook’s Illustrated, November 2007

2 1/2 cups (12 1/2 ounces) unbleached all-purpose flour
1 tsp table salt
2 tbsp sugar
12 tbsp (1 1/2 sticks) cold unsalted butter, cut into 1/4-inch slices
1/2 cup cold vegetable shortening, cut into 4 pieces
1/4 cup cold vodka
1/4 cup cold water

Process 1 1/2 cups flour, salt, and sugar in a food processor until combined, about 2 one-second pulses. Add butter and shortening and process until homogeneous dough just starts to collect in uneven clumps, about 15 seconds (dough will resemble cottage cheese curds and there should be no uncoated flour). Scrape bowl with rubber spatula and redistribute dough evenly around processor blade. Add remaining cup flour and pulse until mixture is evenly distributed around bowl and mass of dough has been broken up, 4 to 6 quick pulses. Empty mixture into medium bowl.

Sprinkle vodka and water over mixture. With rubber spatula, use folding motion to mix, pressing down on dough until dough is slightly tacky and sticks together. Divide dough into two even balls and flatten each into 4-inch disk. Wrap each in plastic wrap and refrigerate at least 45 minutes or up to 2 days.


Bourbon Apple Pie Filling

2 tbsp all-purpose flour
6 or 7 apples, mix of tart and sweet
1/3 cup sugar
1/2 tsp cinnamon
1/2 tsp nutmeg
1/4 tsp salt
1/2 cup bourbon whiskey
2 tbsp lemon juice
2 tbsp butter cut into small pieces

Preheat oven to 425. Place bottom crust in pie plate.

Peel, core, and halve the apples. Cut into 1/4-inch thick slices, about 7 or 8 cups.

In a 4 quart saucepan, whisk together sugar, flour, cinnamon, nutmeg, and salt. Whisk in bourbon whiskey and lemon juice until evenly blended. Cook over medium heat, whisking frequently until the mixture boils and thickens slightly. Add apples and stir until evenly coated. Continue cooking, stirring continuously, for 3 minutes. Set aside to cool, stirring once or twice for 20 minutes.

Pour apple mixture into the pie shell, mounding apples slightly in the center. Dot with butter and add the top crust. Cut several steam vents into top crust.

Bake 25 minutes at 425. Reduce temperature to 350 and bake 45 minutes longer or until crust is brown and juices are bubbling.

Serve warm or chilled with whipped cream or ice cream.


Online Resources

  1. Pie crust recipe from Cook’s Illustrated via Serious Eats
  2. Bourbon apple pie filling recipe adapted from Group Recipes


References Cited

  1. Technology of breadmaking (2007). 2nd ed. New York: Springer. 397 p.
  2. Amend T (1995) The mechanism of dough forming: Efforts in the field of molecular structure. Getreide Mehl Brot 49: 359–362.

Liz Roth-JohnsonAbout the author: Liz Roth-Johnson is a Ph.D. candidate in Molecular Biology at UCLA. If she’s not in the lab, you can usually find her experimenting in the kitchen.

Read more by Liz Roth-Johnson


Pie Science & Fried Fish

NYTimesPie

Amy Rowat dissects the science of pie for the New York Times, while Harold McGee explains how vodka makes a light, crispy batter for frying fish. Apparently pie crust isn’t the only dough that benefits from a little alcohol! Read more

10 More Things You Should Know About Pie

It’s summer. Berries and stone fruits abound, and so the season of pies continues. And we continue to think deeply about the science of pie. There has been intense interest in pies these past few months: first at the Science of Pie event; next at the World Science Festival’s Scientific Kitchen workshop at Pie Corps in New York; and most recently the New York Times Pie Issue. But we believe you can never know too much about pie. Here are 10 more things we think you should know…

WSFPieScience1

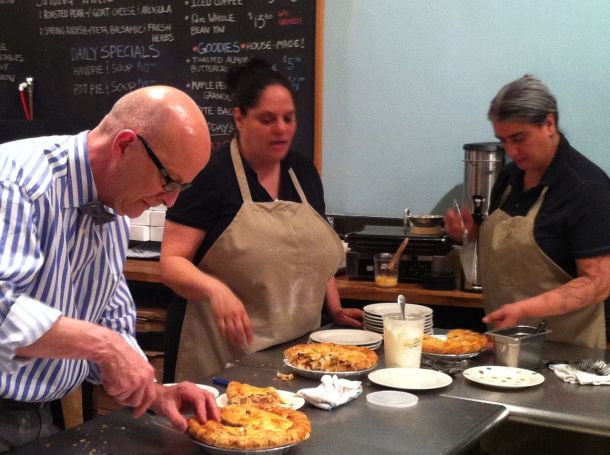
The World Science Festival’s Science of Pie workshop featured Amy Rowat with Pie Corps’ Cheryl and Felipa and special guest Bill Yosses, White House Pastry Chef and mastermind behind some of the best pies that Barack Obama has ever tasted. Here Cheryl, Felipa, and Bill dish out apple pie for the workshop participants.

WSFPieScience2

Science of Pie workshop participants deeply engaged in the science (and eating!) of pie.

1. A bit of high school chemistry goes a long way when baking pies.
The ideal gas law (PV=nRT) tells us that the volume of an air pocket gets bigger with increasing temperature. In the oven, molecules get more energy and start moving faster and faster, causing air pockets to get bigger and bigger; this can result in an inflated pie that collapses once you cut into it. At the same time, apples lose water, most of which gets converted to steam. Consider that a water molecule takes up about 1700 times more volume in the gas phase than in the liquid phase: if your crust were completely impermeable to water and all the steam got trapped inside, your pie would become much larger than your oven! Luckily much of that steam can escape through the crust and through steam vents. (This is also a good reason to be sure to avoid air pockets when you lay your crust into your pie tin!)

2. There is an art to cutting your fruit for a pie filling.
The way you cut your fruit is important. Smaller pieces of fruit will cook more quickly, but they also tend to lose more liquid since they have a higher surface-area-to-volume ratio. The geometry of your fruit pieces is also important for packing the filling into your pie. After placing your fruit slices into the center of the pie, pat them down to make sure they all like flat. This will create a pie with a lovely cross-section of layered fruits and, more importantly, will help to avoid air pockets that can expand in the oven.

3. Sometimes the best pie is a day-old pie.
Temperature is important for pie texture. Eating your pie the day after you bake it allows plenty of time for the pie to cool down and the filling to “set”. Because molecules flow more quickly past each other at higher temperatures, hot pie filling straight from the oven will be more runny; as the pie filling cools, starchy molecules like cornstarch and flour spend more time interacting with each other. As the pie cools, the pectin molecules of your fruit also spend more time interacting with each other. This results in a more solid, gel-like filling that will take longer to seep out of the pie when it is cut and served on a plate.

4. Think of butter as a gas.
Butter is really just a bunch of teeny tiny water droplets dispersed in a matrix of fat. In the oven, these water droplets convert from liquid to gas. This means that the chunks of butter you can see in your dough are really just big pockets of air waiting to happen. More air = flakier crust! While butters with the highest butterfat content are generally synonymous with the highest quality butter, when it comes to baking pie a slightly lower fat content, and higher water content, may be a good thing.

5. Wash with egg for a darker, more delicious pie crust.
All those lovely color and flavor molecules in a nicely browned pie crust are the result of the Maillard reaction, a chemical reaction that occurs between amino acids, which comprise proteins, and sugar molecules like lactose or glucose. Brushing an egg (protein) on your pie crust before baking is a great way to add extra color and flavor. For extra browning, mix some heavy cream into your egg wash (more protein plus lots of lactose).

WSFPieScience3

Look at all those Maillard reactions!

6. Turn up the heat!
Maillard reactions happen faster at higher temperatures. Keep your oven hot (375F or so) to brown your pie that extra bit more. Another strategy is to start off at 400F, then turn down the temperature to 350F.

7. Bake your pie in parts.
A major challenge in baking pie comes from its complexity: you’ve got a crust that should be brown and crisp together with a filling that largely contains water. When contending with fruit pie fillings, one strategy is to prebake the bottom crust to help prevent it from becoming soggy. In this process of “blind baking,” don’t forget to prick holes in the bottom of your crust so the water vapor can escape. Filling your pie crust with pie weights or dried beans during this process can also help prevent layers of your wanton bottom crust from puffing up. Pie master Bill Yosses suggests taking this sequential baking process an extra step further: after the bottom crust has baked, it can be stitched into the sides of a crust using extra dough to “glue” the bottom to the sides. In the spirit of experimentation, this could be an interesting new method to try.

8. Create a pie crust with your “perfect” texture.
Typical attributes of a “perfect” pie crust include: flaky, tender, brown, and a little crispy. While the optimal texture of a pie crust is a deeply subjective and personal matter, here is a rough guide to how you can tune your pie crust texture simply by considering how you work your fat into your flour. For taste, color, and texture, we prefer butter, but shortening or lard can also be used.

  1. You want your fat to be solid when working it into the flour. Remember those little chunks of fat will become pockets of air in your crust! In a liquid form, it would coat the flour too evenly, resulting in a less flaky crust.
  2. Because butter melts around 30–32 degrees Celsius (86–90F), it can be tricky to make sure it remains solid while you work it with your hands (about 35 degrees Celsius or 95F). Prior to making your dough, cut your butter into small 1 x 1 cm cubes and place in the freezer for about 10-15 minutes.
  3. For a crust that has more form and larger flaky holes, work your very cold butter into the flour until you have a distribution of butter pieces with various sizes: some should appear the size of peas, others the size of almonds. When you work your butter in to achieve these sizes of chunks, much of the butter will get worked in so the rest of the dough will appear as coarse wet sand.
  4. For a tender and flaky crust you need a decent coating of fat around your flour. To achieve this, try the two-step method: (i) Divide your butter in half: cut one half into small cubes, and keep the remaining half in stick form. Place both halves in the freezer to ensure they are very cold. (ii) Work the stick of very cold butter into your flour by grating it in with a coarse grater. Work in thoroughly with your hands until the mixture has the texture of a coarse sand. (iii) Add the remaining half of your butter in cubes and work in with your hands until the largest pieces are about the size of peas. The theory here is that completely coating the flour in oil helps create a more “tender” crust.
  5. If you want to avoid getting your hands messy, or want to minimize heating of your butter, use a pastry cutter, or two knives held side by side, to work the butter into your flour.

9. Different types of flour create different types of pie crust.
What flour is the best flour for pie crust? This is a contentious question that has a variety of answers depending on personal preference, but the type of flour you use can have a major effect on the final texture of your crust. The protein content of flour, based on the type of wheat the flour was made from, will affect the extent of gluten formation in your dough. While springy networks of gluten proteins are great for chewy breads (bread flour has particularly high protein content), they can make pie crust dense and tough. Flours with lower protein content, such as pastry flour or cake flour, will create less extensive gluten networks and can produce a more tender crust. However, the pie crust ultimately needs to be formed into a dough, which can make it a challenge to work with a fragile dough that can result when using a low-protein content flour.

10. Almond extract tastes great in a fruit pie.
What more can we say? Nuts and fruit taste great together! A bit of almond extract is a delicious complement to apples and apricots alike.

AppleFoodPairing

And it’s not just almonds—lots of fruits and nuts go great with apples. This food pairing map from www.foodpairing.com is full of interesting flavor combinations.


Amy RowatAbout the author: Amy Rowat is a professor at UCLA. She began experimenting with food as a toddler and continues to research soft biological matter in the lab and kitchen.

Read more by Amy Rowat


Understanding Umami

Imagine taking a bite of your favorite food. Is it sweet? Salty? Does it have a sour bite or a hint of bitterness? Maybe even a touch of savory umami?

Every time we eat, our taste buds sample these five basic taste qualities. Taste receptors decorating the surface of each taste bud interact with specific molecules; the corresponding flavor sensation then gets sent to your brain. Umami receptors, for example, sense the molecule glutamate. When free glutamate in our food—either naturally occurring or from added MSG—interacts with an umami receptor, we taste a delicious savory flavor.

Although glutamate is the primary source of umami flavor, certain molecules called nucleotides can enhance the umami sensation. Because nucleotides make up the genetic material (DNA and RNA) of all living things, nucleotides are ubiquitous in many of the foods we eat. Nucleotides themselves cannot activate umami taste receptors, but they can intensify the umami sensation caused by glutamate. Intrigued by this phenomenon, scientists Ole Mouritsen and Himanshu Khandelia recently published a paper exploring how one nucleotide, guanosine-5ʹ-monophosphate (GMP), might work together with glutamate to activate umami taste receptors.

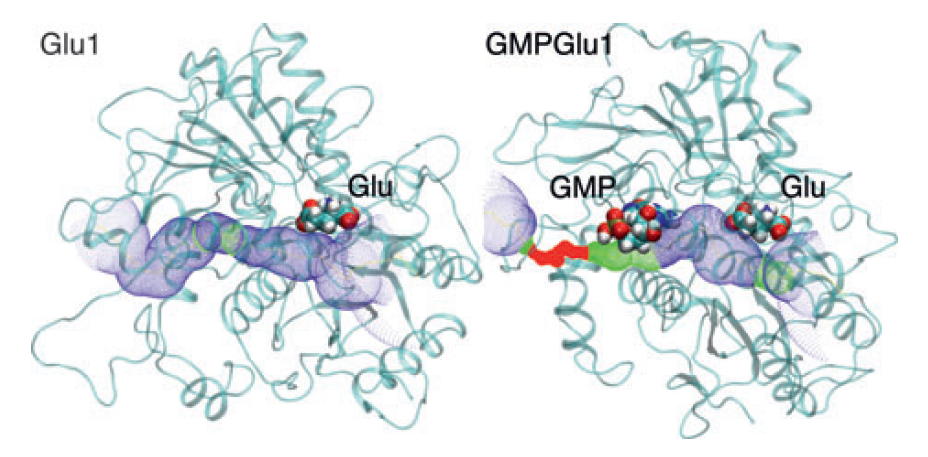
Only one of the three known umami taste receptors can interact with both glutamate and GMP. This so-called “T1R1/T1R3” receptor switches between two states: an “off” state when no glutamate is present and an “on” state when glutamate is attached to the receptor. To understand how GMP might affect these two states, Mouritsen and Khandelia ran a series of computer simulations testing the receptor’s behavior in the presence or absence of GMP. As expected, glutamate caused the receptor to exist in the “on” state more than the “off” state. When GMP was added to the simulation, both GMP and glutamate interacted with the receptor to further stabilize the “on” state.

Model of the T1R1/T1R3 umami taste receptor. The taste receptor (in blue) is “off” when no glutamate is present. Glutamate interacts with the receptor, stabilizing the “on” state and signaling an umami taste sensation. Glutamate and GMP together bind the receptor and further stabilize the “on” state, presumably leading to a longer, more intense umami sensation.

Besides providing a compelling molecular model for umami taste sensation, this and future work on taste receptors may help us become more savvy seasoners in the kitchen. Because umami taste receptors are similar to the taste receptors for sweet and bitter, understanding how molecules like GMP enhance umami sensations can help us develop enhancers for other taste sensations. Just as GMP makes glutamate taste more intensely umami, a sweet enhancer could make sugar taste sweeter with no added calories. Identifying more taste enhancing molecules like GMP could bring a whole new dimension to the way we cook in the future. Forget about salt and pepper—the flavor enhancers are coming.


ProfileImageSmallAbout the author: Liz Roth-Johnson is a Ph.D. candidate in Molecular Biology at UCLA. If she’s not in the lab, you can usually find her experimenting in the kitchen.

Read more by Liz Roth-Johnson


Chemophobia & The Myth of MSG

MythOfMSG

Chemistry professor Michelle Francl challenges our culture of chemophobia, while Harold McGee addresses some common misconceptions about “Chinese restaurant syndrome” and MSG. Read more

Umami Burger

If you have ever enjoyed the savory flavor of soy sauce or the rich, full flavor of Parmesan cheese, then you have experienced the taste sensation known as umami. The term “umami” was first coined in 1908 by Dr. Kikunae Ikeda to describe the unique savory taste of seaweed broth [1,2]. Although umami was initially associated only with Asian cuisines, researchers all over the world have now established umami as one of the five basic taste groups [3].

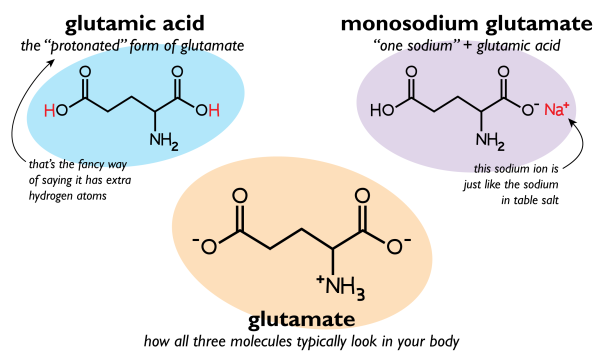
In his original study of umami, Dr. Ikeda isolated the amino acid glutamate from dried seaweed and found that this molecule was sufficient to create a strong umami flavor [1]. As an amino acid, glutamate is an important component of proteins and occurs naturally in all living things. When it is not incorporated into a protein, “free glutamate” can readily bind to glutamate receptors in our taste buds to trigger the umami taste sensation [4]. Despite their different names, glutamate, glutamic acid, and monosodium glutamate are essentially the same molecule and behave the same way in our bodies.Glutamate

Since the original discovery of glutamate, scientists have identified additional molecules that contribute to the umami taste sensation. The nucleotides inosine 5ʹ-monophosphate (IMP) and guanosine 5ʹ -monophosphate (GMP) are responsible for the umami taste of bonito and shiitake mushrooms, respectively [5]. Because nucleotides make up our genetic material, molecules like IMP and GMP are ubiquitous in living organisms. Interestingly, IMP and GMP alone do not have strong umami flavor but can synergistically enhance the umami sensation of glutamate [4,6].

Practically all living things contain the umami molecules glutamate, GMP, and IMP. Proteins are built from amino acids like glutamate, whereas the genetic molecules DNA and RNA are made up of nucleotides like GMP and IMP. More specifically, GMP is an important component of RNA, including the “messenger RNA” (mRNA) that is transcribed from DNA and subsequently translated into proteins. IMP is not a typical component of mRNA, but is instead incorporated into other types of specialized RNA molecules like “transfer RNA” (tRNA). Free IMP can also be derived from the energy molecule ATP. Although all living things contain GMP and IMP, free GMP is found predominantly in mushrooms, while free IMP is found mainly in animal products [7].

Although glutamate is most notoriously used as a flavor-enhancing food additive in the form of MSG, many foods naturally contain high levels of free glutamate [7]. For example, a ripe tomato straight from the vine contains free glutamate levels similar to Worcester sauce [3,8]. Free IMP and GMP also occur naturally in many foods. Animal products like pork, chicken, and tuna are full of IMP, while GMP is most prevalent in mushrooms, yeasts, and plant-based foods [3,9].

Simple food processing techniques like fermentation, curing, and extraction can also increase natural levels of free glutamate, IMP, and GMP by breaking down proteins and genetic material [3,7]. During the production of soy sauce and many cheeses, the fermentation process breaks down soy or milk proteins, respectively, releasing many free glutamate molecules. Similarly, the cooking processes used to produce extracts like Marmite (yeast extract) break down proteins and genetic material to release free glutamate, IMP, and GMP.

This recipe, originally created by Adam Fleischman, capitalizes on the umami flavor of several common natural and processed ingredients to create one insanely tasty burger.

Approximate free glutamate content of Umami Burger ingredients. Approximate content of IMP and/or GMP is also reported for some ingredients. All values are reported as milligrams per 100 grams of the ingredient and are based on those reported in [3,7,8,10,11].

Adam Fleischman’s Umami Burger
Makes 4 burgers

Umami Ketchup
1 32-ounce can San Marzano tomatoes
1 medium onion, chopped
3 tablespoons olive oil
2 tablespoons tomato paste
½ cup packed dark brown sugar
½ cup cider vinegar
1 teaspoon salt

Purée the tomatoes with the juice from can in a blender until smooth. Cook the onion in oil in a heavy saucepan over moderate heat, stirring, until softened, about 8 minutes. Add the puréed tomatoes, tomato paste, brown sugar, vinegar, and salt and simmer, uncovered, stirring occasionally, until very thick, about 1 hour. Purée the ketchup in a blender until smooth. Chill, covered, overnight for flavors to develop.  Then add the umami seasonings to taste and chill the ketchup until needed.

Umami Seasonings
2 salted anchovies, cleaned
Tamari
Worcestershire sauce
Marmite
Truffle salt
Harissa

Combine the anchovies with the remaining ingredients to taste. Blend in a mortar and pestle or, for larger quantities in a blender or food processor. Set aside.

Oven-Dried Tomatoes
1 tablespoon brown sugar
1 tablespoon tomato paste
¾ teaspoon soy sauce powder
½ teaspoon Worcestershire sauce
2 pounds ripe tomatoes, sliced

Preheat the oven to its lowest temperature setting. Stir the brown sugar, tomato paste, soy sauce, and Worcestershire sauce together; brush on the sliced tomatoes. Put the tomatoes on a line sheet pan; dry in the oven overnight.

Caramelized Onions
2 pounds large onions
1 tablespoon unsalted butter
1 tablespoon vegetable oil
½ teaspoon table salt
2 star anise

Cut the onions in half from pole to pole; peel and slice across the grain to ¼-inch thickness. Heat the butter and oil in a 12-inch nonstick skillet over high heat; when the foam subsides, stir in the salt and star anise. Add the onions and stir to coat; cook, stirring occasionally, until the onions begin to soften and release some moisture, about 5 minutes. Reduce the heat to medium and cook, stirring frequently, until the onions are deeply browned and slightly sticky, about 40 minutes longer.

Parmesan Crisps
3 ounces Parmigiano-Reggiano

Preheat the oven to 375°F. Using the largest holes on a box grater, coarsely shred enough cheese to measure 1 cup. Line a large sheet pan with a nonstick liner, like Silpat. Arrange tablespoons of cheese 2 inches apart on the liner. Flatten each mound slightly with a spatula to form a 3-inch round. Bake in the middle of the oven until golden, about 10 minutes. Cool for 10 minutes on sheet on a rack; then carefully transfer each crisp with a metal spatula to a rack to cool completely.

To Assemble and Serve
1 ½ pounds assorted cuts of well-marbled beef (short rib, flap, skirt, brisket or hanger)
Vegetable oil
Salt and freshly ground black pepper
1 tablespoon butter
6 ounces shiitake mushrooms, stems removed
4 soft buns (potato or Portuguese), halved

Grind the beef coarsely in a meat grinder or food processor. Put 6 ounces of meat into a 4-inch ring mold and gently tap down to form into a patty. Heat a cast iron skillet on high for 5 minutes. When it’s very hot, pour in a drop of vegetable oil to lubricate the pan. Season the patties liberally with salt and pepper. Add the patties to the skillet and sear on one side for 3 minutes; flip once and sear for 2 more minutes for medium rare.

In another skillet, add half of the butter and sauté the mushroom caps for until soft, about 2 minutes. Set aside. Remove the beef patties to rest. Wipe the mushroom skillet and toast the buns cut side down with the remaining butter.

Remove the buns when toasted and add spread about 2 tablespoons of the umami ketchup on both halves of the bun. Stack a beef patty with 1 tablespoon of the caramelized onions, a parmesan crisp, 2 mushroom caps and 2 slices of oven dried tomato. Serve immediately.

Additional Resources

  1. Recipe adapted from Star Chefs
  2. “The Myth of MSG with Harold McGee” from Mind of a Chef
  3. Mosby, Ian. “‘That Won-Ton Soup Headache’: The Chinese Restaurant Syndrome, MSG and the Making of American Food, 1968-1980.” Soc Hist Med (2009) 22 (1): 133-151.

References Cited

  1. Ikeda K (2002) New Seasonings. Chemical Senses 27: 847–849. doi:10.1093/chemse/27.9.847.
  2. Nakamura E (2011) One Hundred Years since the Discovery of the “Umami” Taste from Seaweed Broth by Kikunae Ikeda, who Transcended his Time. Chemistry – An Asian Journal 6: 1659–1663. doi:10.1002/asia.201000899.
  3. Yamaguchi S, Ninomiya K (2000) Umami and food palatability. J Nutr 130: 921S–6S.
  4. Li X (2002) Human receptors for sweet and umami taste. Proceedings of the National Academy of Sciences 99: 4692–4696. doi:10.1073/pnas.072090199.
  5. Kurihara K (2009) Glutamate: from discovery as a food flavor to role as a basic taste (umami). Am J Clin Nutr 90: 719S–722S. doi:10.3945/ajcn.2009.27462D.
  6. Zhang F, Klebansky B, Fine RM, Xu H, Pronin A, et al. (2008) Molecular mechanism for the umami taste synergism. Proceedings of the National Academy of Sciences 105: 20930–20934. doi:10.1073/pnas.0810174106.
  7. Ninomiya K (1998) Natural occurrence. Food Reviews International 14: 177–211. doi:10.1080/87559129809541157.
  8. Rundlett KL, Armstrong DW (1994) Evaluation of freeD-glutamate in processed foods. Chirality 6: 277–282. doi:10.1002/chir.530060410.
  9. Maga J (1995) Flavor Potentiators. Food additive toxicology. New York: M. Dekker. pp. 379–412.
  10. Skurray GR, Pucar N (1988) l-glutamic acid content of fresh and processed foods. Food Chemistry 27: 177–180. doi:10.1016/0308-8146(88)90060-X.
  11. Populin T, Moret S, Truant S, Conte L (2007) A survey on the presence of free glutamic acid in foodstuffs, with and without added monosodium glutamate. Food Chemistry 104: 1712–1717. doi:10.1016/j.foodchem.2007.03.034. 

ProfileImageSmallAbout the author: Liz Roth-Johnson is a Ph.D. candidate in Molecular Biology at UCLA. If she’s not in the lab, you can usually find her experimenting in the kitchen.

Read more by Liz Roth-Johnson