Deep-fried Turkey: Delicious or Dangerous?

3064683256_6e96371c10_o

Is a Deep-Fried Turkey your Destiny [Photo Credit: Jinx!]

While you may think the most dangerous thing you can do during the holidays is talk politics with your uncle, starting a kitchen fire is a more realistic threat to your safety. According to the United States Fire Administration (USFA), the number of structure fires double on Thanksgiving, causing on average $28 million in property damage1. Cooking causes the majority of these blazes, with grease and oil as the main culprits in ignition2. Despite the astonishingly large number of holiday mishaps, home cooks continue using fats. A select few even engage in one of the most daring of food adventures: deep-frying a turkey.

A quick Internet search for “deep-fried turkey” reveals how dangerous this culinary practice can be. There are plenty of videos and pictures that document the aftermath of a deep-fried turkey fire. A careless and unprepared chef can turn a deep-fried turkey into a deep-fried disaster within minutes. The bird quickly becomes engulfed in a fireball that can be seen from the rest of the neighborhood. So then, what makes deep-frying more appealing than roasting? More importantly, can it be done safely?

8158841748_2b8ba63f57_o

[Photo credit: State Farm]

The key to effectively deep-frying a turkey is oil. Oil makes the bird both delicious and dangerous. Oil’s interaction with the poultry causes the characteristic crispy golden brown crust that draws people to deep-frying. This same oil, however, can ignite and cause a fire. To effectively and safely deep-fry a turkey, you must understand the science underlying deep-frying.

4217518108_6b62239847_o

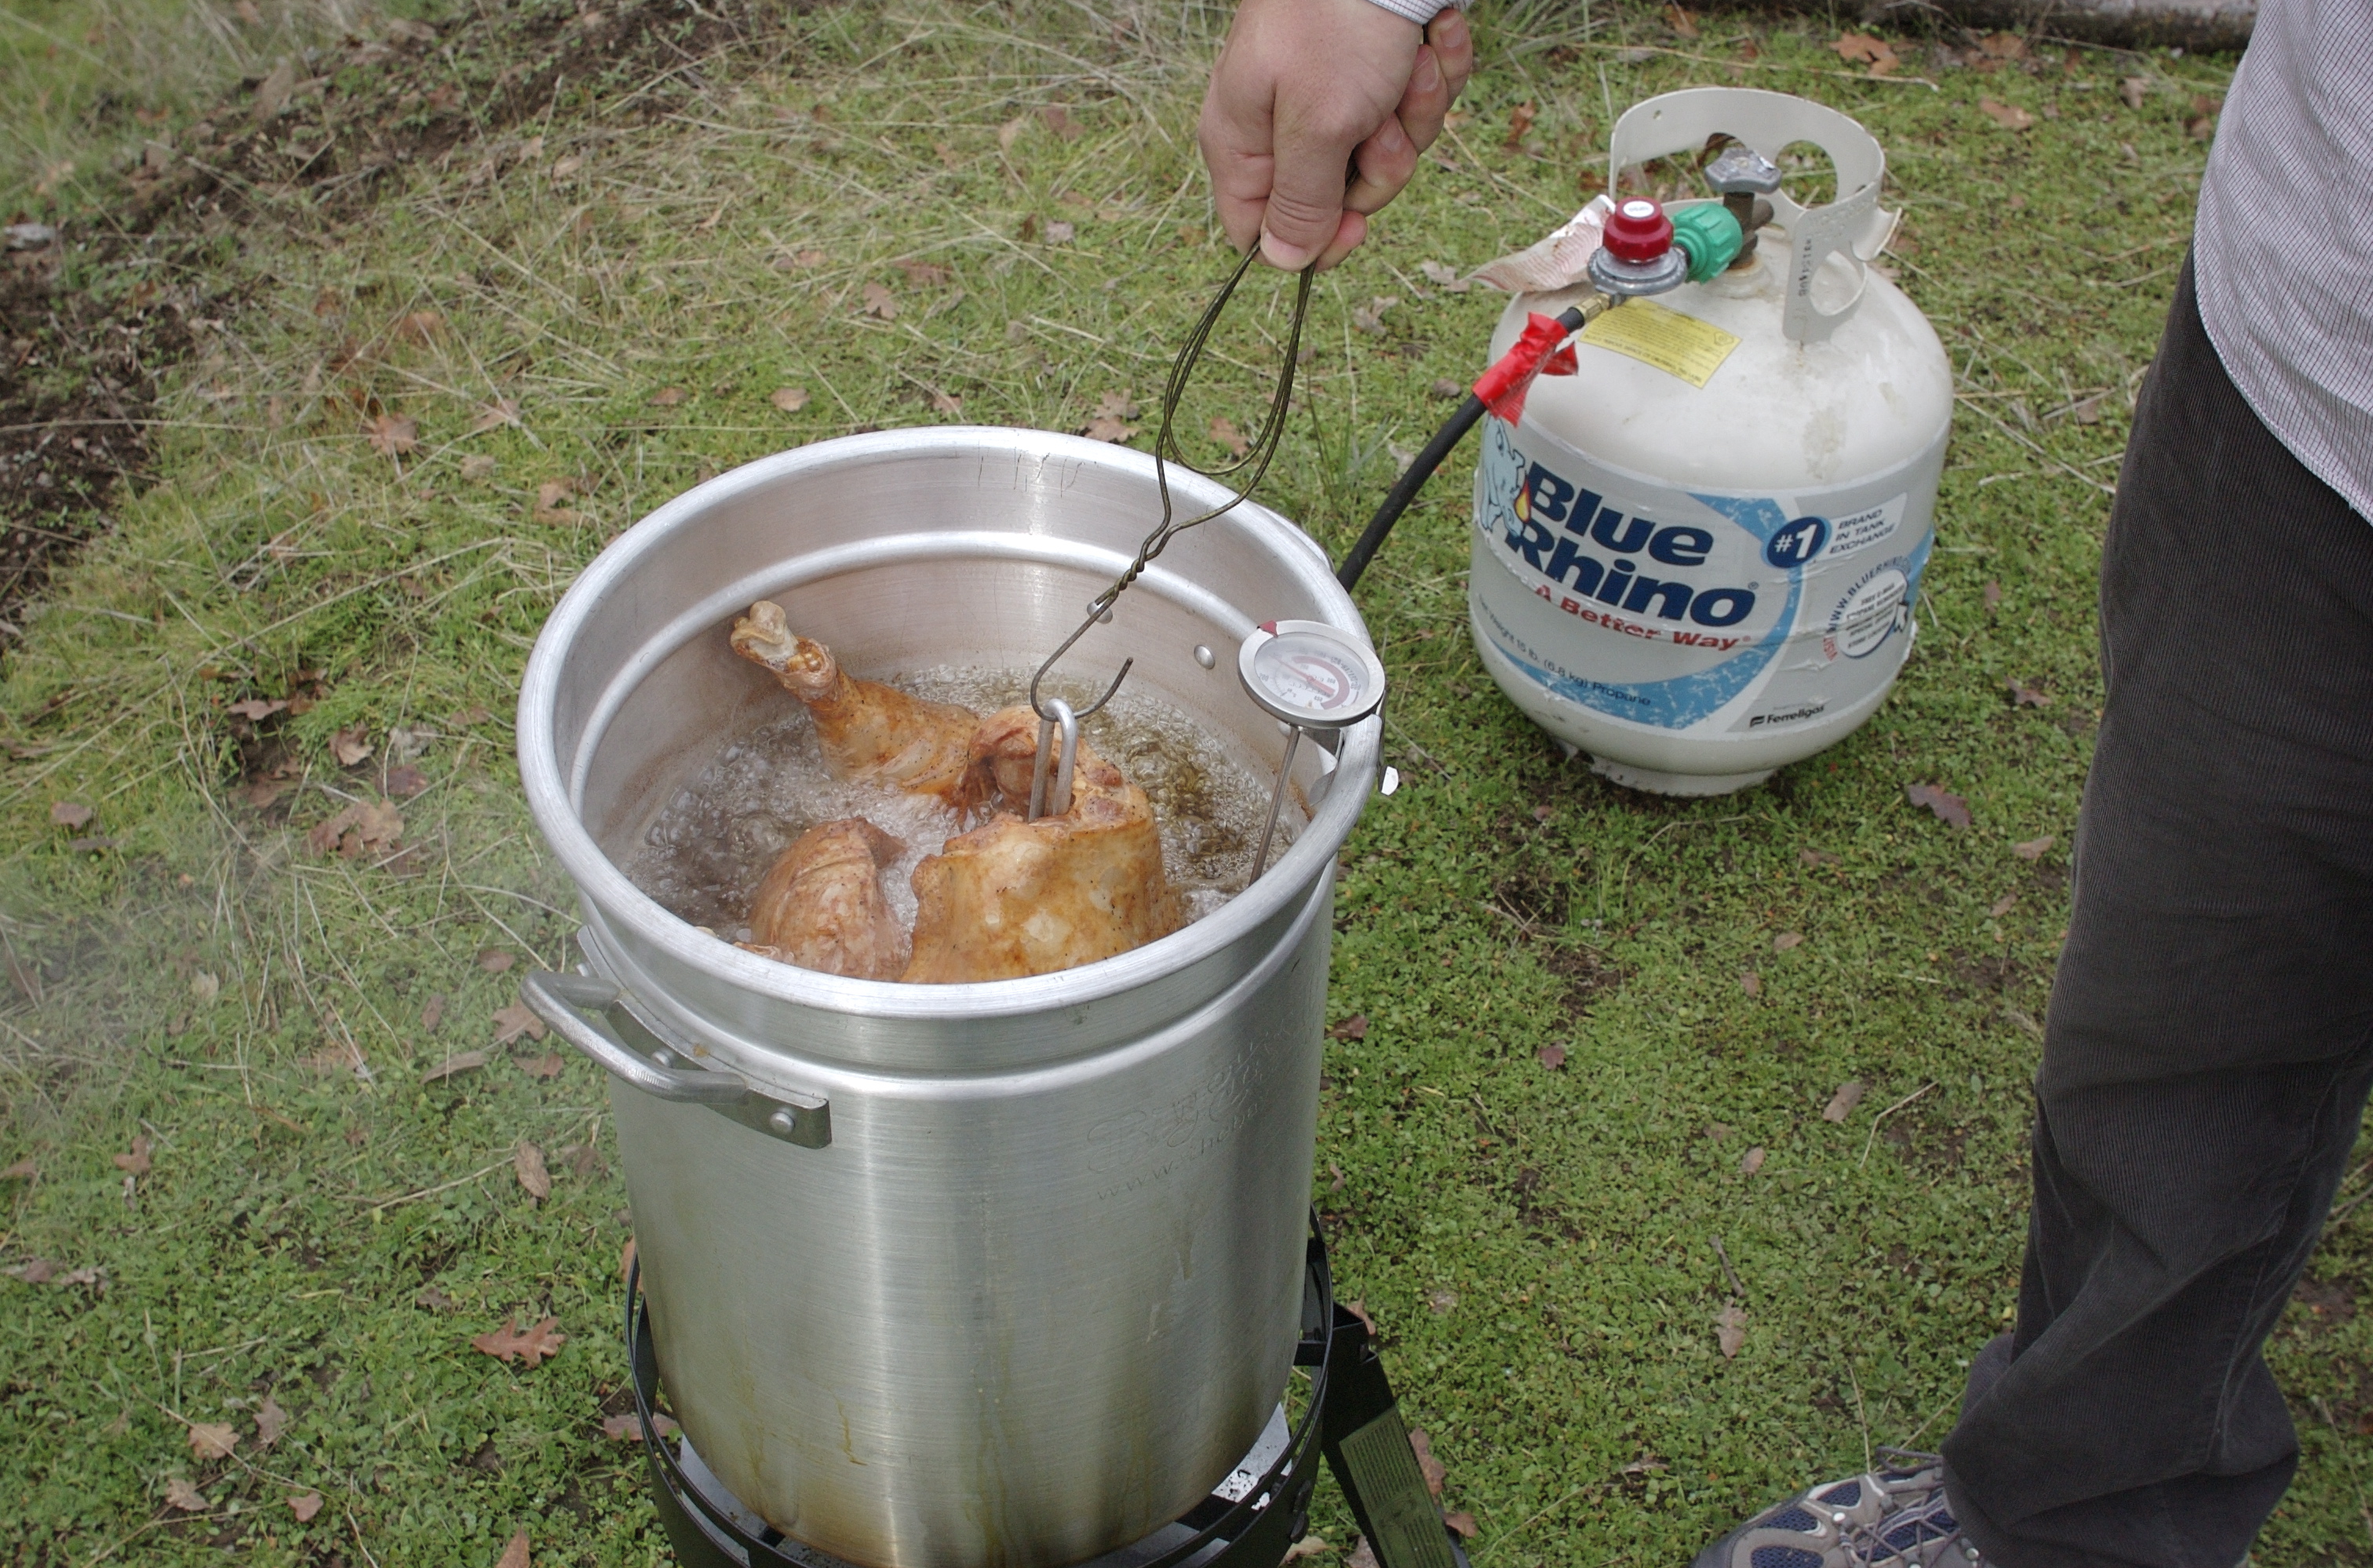
Oil is the key to a Deep-Fried Turkey [photo credit: Joe]

The main appeal of a deep-fried turkey is the texture created by oil interacting with the bird’s skin. In deep-frying, hot oil completely engulfs the food. Put an uncooked turkey in hot oil and bubbles immediately start forming. The bubbles are not from the oil, but from the water within the surface of the bird that escapes as tiny pockets of steam. Water boils at 212 °F, but the temperature of oil in a deep fryer is typically around 350 °F or greater. Because of these high temperatures, the water in the turkey skin rapidly evaporates. This dehydration at the surface combined with the high temperature make conditions perfect for the Maillard reaction.

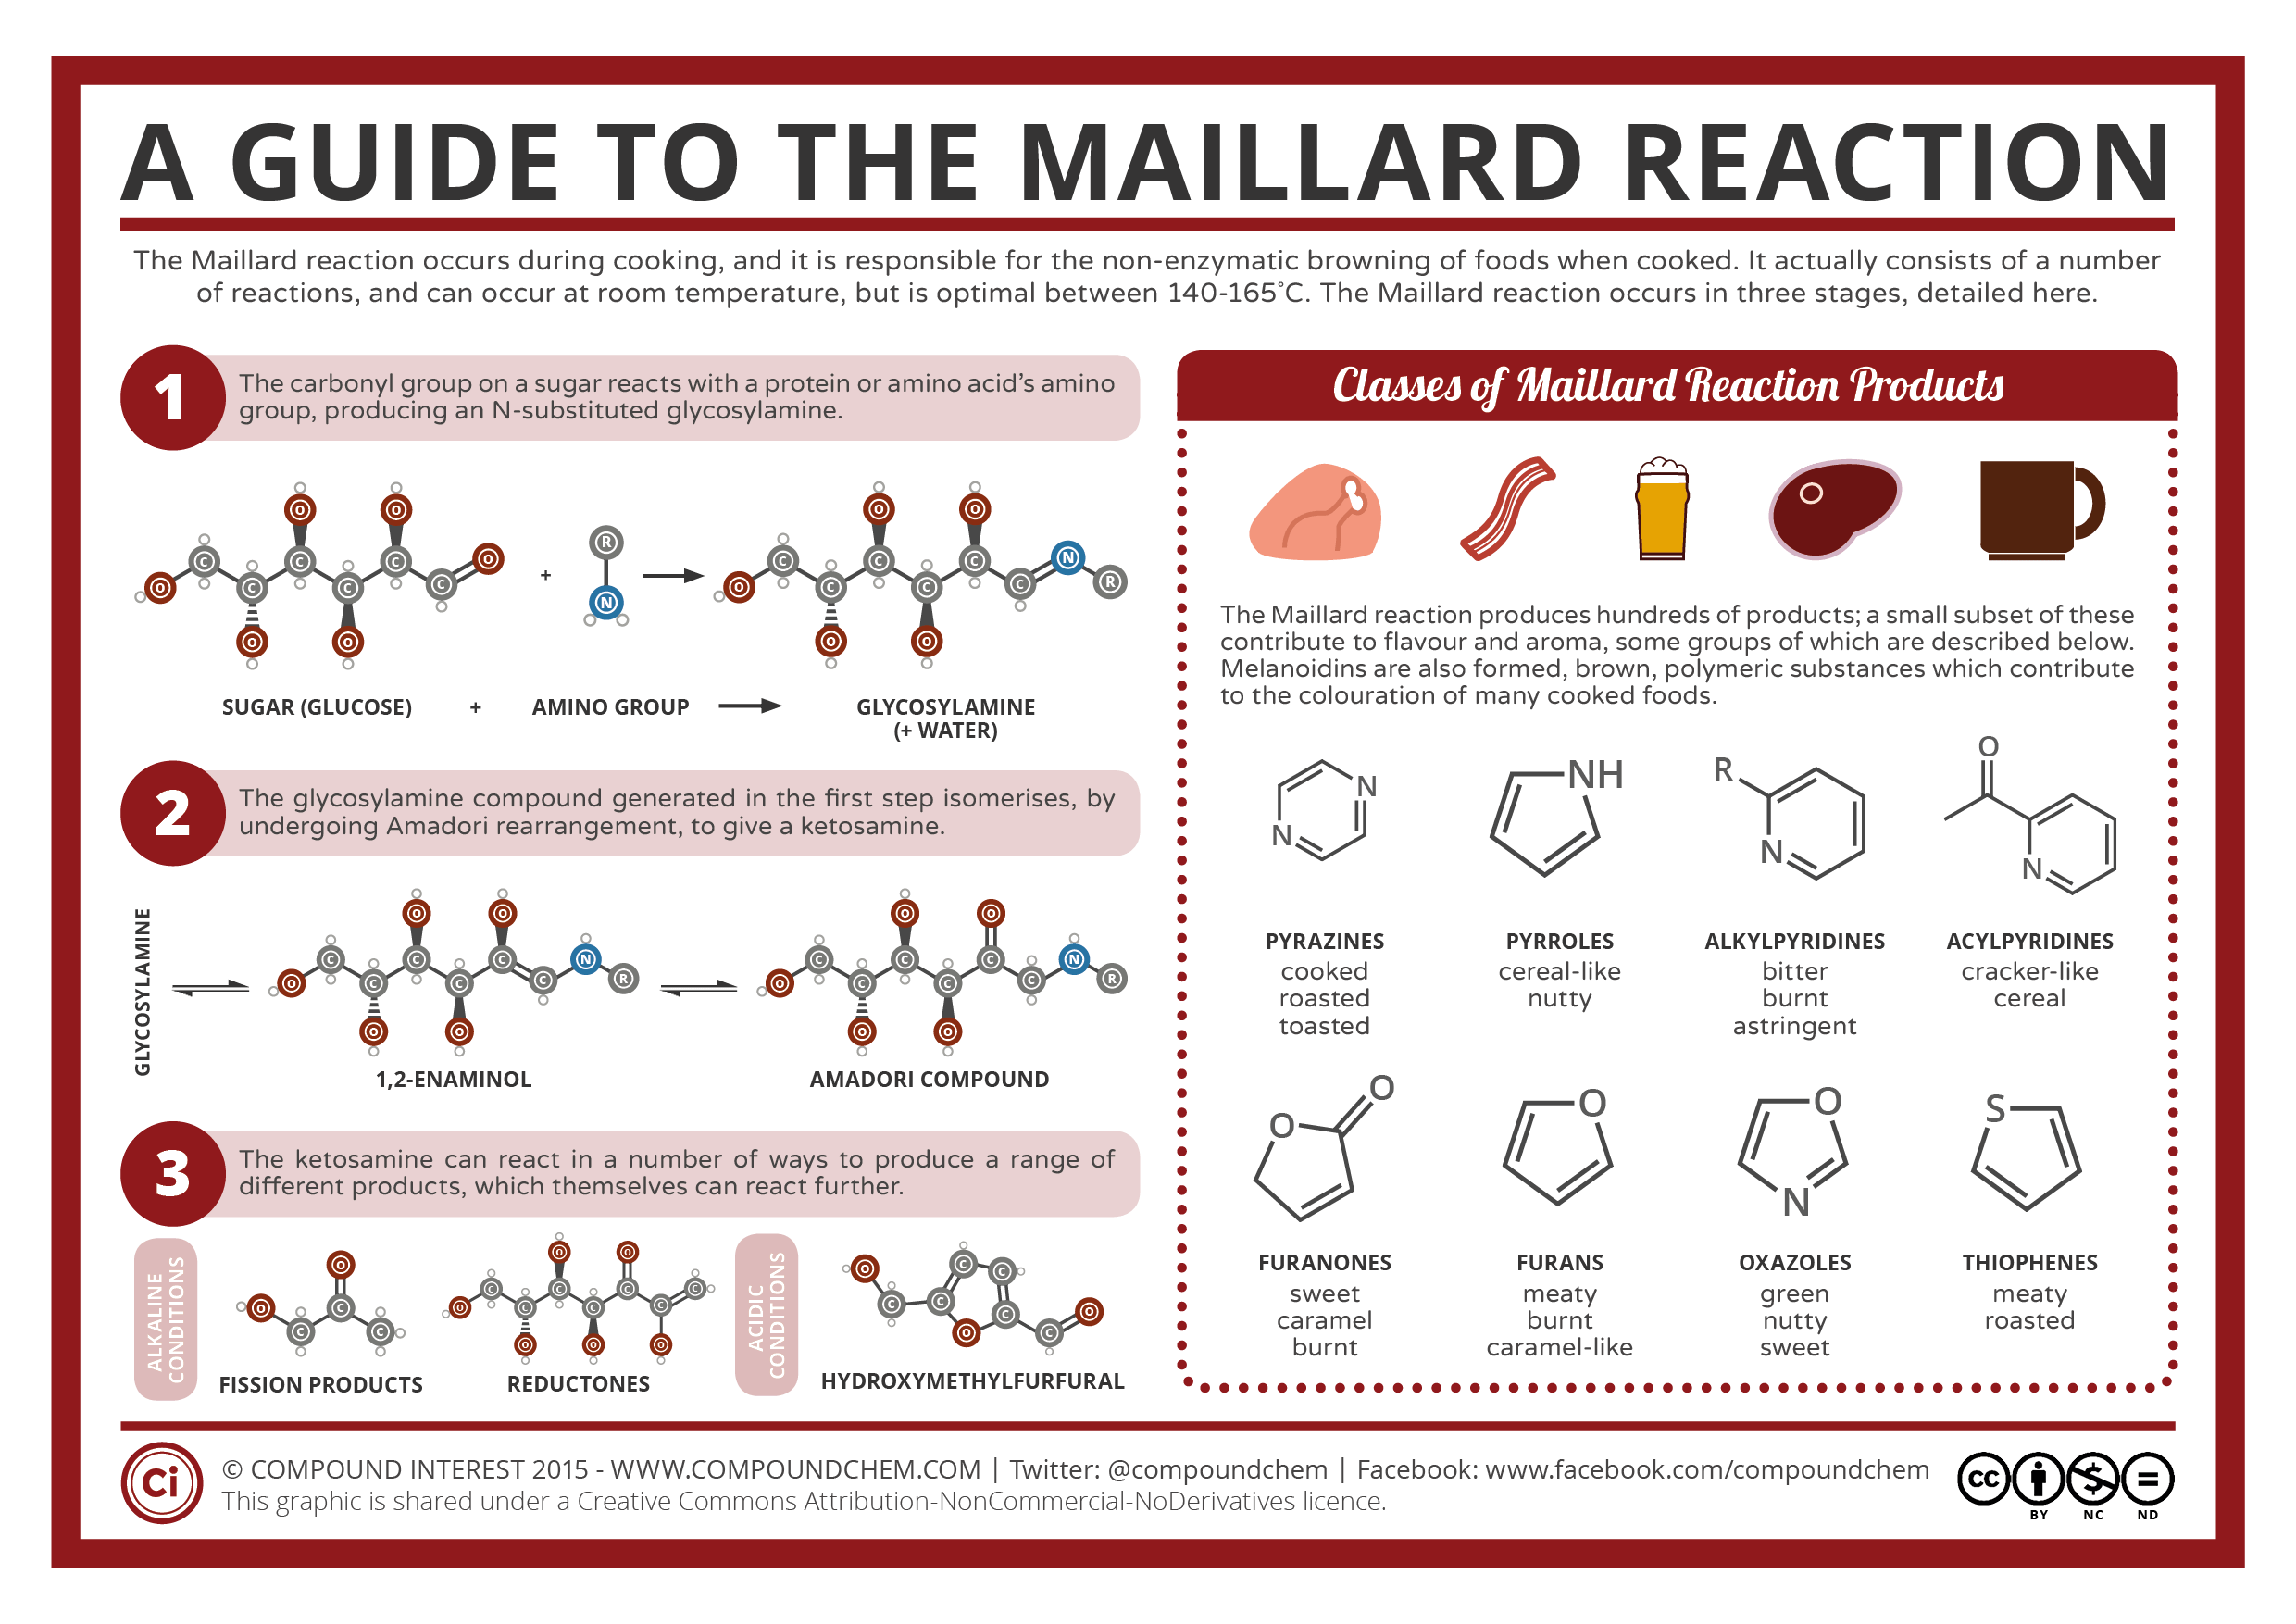
Maillard reactions create the characteristic deep browning and appealing aromas that you may have experienced when you deep-fry a turkey. These reactions typically occur when proteins and sugars in foods are exposed to high heat (284 – 329 °F): the amino acid building blocks of proteins react with sugars at high heat to create a complex set of flavor molecules. This is why a deep-fried turkey may evoke similar flavors and aromas as seared steak, roasted coffee, or toasted bread. As heat continues to vaporize the water on the bird’s skin, the reaction speeds up and the resulting flavor molecules become more and more concentrated.

While Maillard reactions can also be achieved through roasting a turkey, deep-frying avoids some of the pitfalls of oven roasting. First, because the hot oil completely envelops the bird, the outside gets an even brown coat. The temperature of the oil remains relatively constant as it spreads into every crevice. Such uniformity can be harder to achieve in traditional oven roasting, because of differences in air temperature within the oven. Moreover, poor heat circulation can result in uneven cooking. In extreme cases, you might find one side of the turkey charred, while the other is still undercooked.

Next, because the oil can transfer more heat than air per unit volume and time, deep-frying can allow the bird’s surface to get hot quickly enough so that the inside does not overcook. In deep-frying, oil acts as the workhorse transferring heat to food. By contrast, ovens rely on air to transfer heat. Compared to air, cooking oil has a much higher rate of heat conduction. Heat transfers between substances when the molecules collide and transfer energy. Because a liquid such as oil is more dense then air, its molecules are more closely packed; there are more molecules per volume to transfer energy. As a result, the high heat needed for the Maillard reactions develops much faster in a deep fryer than in the oven. In general, oven roasting generally takes about 2-4 hours, while deep-frying can take as little as 30 minutes. Slower increases in surface temperature, as in the case of the oven, allow for more time for the high heat to spread to the center of the turkey and overcook the inside.

Many deep-frying fans claim that the practice “seals in the juices”, however, internal temperature has a larger impact on moisture. If you’ve ever bit into a dry piece of fried chicken, you know, that deep-frying does not guarantee juicy poultry. Fans claim that oil creates a barrier to lock in moisture, but as previously highlighted, hot oil causes it to vaporize and escape. Even water near the interior can escape if it reaches the boiling point because the crust remains porous. The meat on the inside cooks in the same way as in roasting, but only faster because the oil transfers more heat. Thus, regardless of whether you deep-fry or roast the bird, you need to watch the internal temperature to get a juicy turkey.

While hot oil is essential for transforming your turkey into a delicious brown and crispy treat, properly controlling the oil will keep you safe. The first step is having the proper equipment. While a turkey can be deep fried in any number of large pots you already have, none of them are specifically designed to safely handle 3 gallons or more of hot oil and a giant turkey. Having a deep fryer specific for turkeys ensures that when you use the right amount of oil, the turkey is completely submerged and the oil won’t overflow. Also you can cook with a turkey deep fryer outside; this keeps the hot oil safely away from anything flammable in your home. So if you do make a mistake, it’s far away from anything that can spread a fire.

Next, to avoid turning the turkey into a giant fireball, it must be properly dried. This means checking that the bird is completely thawed and free of excess water. If too much ice or water remain, either can quickly vaporize causing oil to spray into the air. You may have seen a similar reaction occur when you throw drops of water into hot oil to test if it’s reached frying temperature. Sudden vaporization results in tiny droplets of oil spewing out in a fine mist. As microscopic droplets, the oil increases its chances of contacting the burner and reaching its flash point, or the temperature at which a material can ignite. (The flash point is around 600-700°F for many cooking oils.) In the deep fryer, oil won’t get as hot, but as droplets, oil can reach this temperature because of their small size and increased surface area. The ignition of a few small oil droplets can set off a chain reaction that engulfs the entire bird. This is why a seemingly innocent icy turkey can turn into a fireball.

Finally, you may want to consider that deep-frying adds a significant amount of fat to your bird compared to roasting it. The entire surface of the turkey is covered in oil and some may seep into the interior. In general, deep-frying can result in as much as 5 to 40% of a food’s weight in oil3. If you are concerned about your fat intake you might want to avoid this deep-fried treat. However, eating a deep-fried bird only on Thanksgiving likely won’t jeopardize your health too much.

Deep-frying a turkey requires significant culinary effort. Although this cooking method is potentially dangerous, your fowl can develop delicious flavors and aromas that cannot be achieved as quickly in the oven. Whether or not you want to make the investment ultimately depends on what you like about eating turkey. If you only care about juicy meat, then using an oven and monitoring the temperature can be easier. However, if you crave a truly unique treat encased in a crispy brown crust, then deep-frying a turkey may be your next gastronomic adventure.

References cited

    1. USFA. Thanksgiving Day Fires in Residential Buildings (2009-2011) http://www.usfa.fema.gov/downloads/pdf/statistics/snapshot_thanksgiving.pdf
    2. USFA. Cooking Fires in Residential Buildings (2008-2010) http://www.usfa.fema.gov/downloads/pdf/statistics/v13i12.pdf
    3. Owen R. Fennema, editor, Food Chemistry, 2nd Edition (New York: Marcel Dekker, Inc, 1985), 210-221

Vince ReyesAbout the author: Vince Reyes earned his Ph.D. in Civil Engineering at UCLA. Vince loves to explore the deliciousness of all things edible.

Read more by Vince Reyes


Pumpkin Domestication & Fruit Benefits

sn-squashes

If pumpkins are on your menu this Thanksgiving, be thankful that hundreds of years of human domestication has turned this once super-bitter squash into a sweet dessert. Furthermore, human intervention may have prevented gourds and squashes from extinction. As for reasons to be thankful for cranberries, scientific research shows that a compound within cranberries could prevent urinary tract infections.
Read more

Cranberry

Cranberries are harvested in late autumn, just in time to celebrate the holidays. Whether you prefer to enjoy cranberries in a jam, as a sauce from the can, juiced, dried, or fresh, there’s no denying that cranberries are festive. They’re tart, dark red, and pair really well with a turkey dinner (according to science). Read more

Kombucha Brewing: The Process

Photo credit: Mgarten (Wikimedia Commons)

Photo credit: Mgarten (Wikimedia Commons)

At first glance, making kombucha sounds straightforward. After all, kombucha is fermented tea, which tells all you need to know about making it: take some tea and ferment it. Unfortunately, brewing kombucha is not that simple, as evidenced by the plethora of information and recipes found on the Internet. For those who have ever contemplated or even decided to begin brewing kombucha for the first time, don’t let the wealth of kombucha information intimidate you. Here, we break down the process of kombucha brewing and experimentation, supplying you with the scientific rationale for each step. Understanding the science of each stage may allow for a more successful and experimental brewing without having to rely on a recipe.

1. Making the tea base.

The tea base is nothing more than sweetened tea, so it is easy enough to make. However, the amount of tea and sugar used will affect the flavor of the resulting kombucha. The exact proportion of water to tea to sugar can be modified to suit personal tastes. For the varieties of teas and sugars suitable for making kombucha, check out our previous post on the ingredients that go into making kombucha.

In general, for every 1 cup of boiled water, steep 1 tea bag or 1 ounce of loose leaf tea; this should be left to steep for 3 – 5 minutes, with deviations depending on the type of tea and desired tea strength. Certain teas, such as green and white teas, have subtle flavor profiles that may result in a bland-tasting kombucha. To obtain a more concentrated flavor with delicate teas, use more tea bags, do multiple infusions, or combine the green or white teas with a more robust black tea.

If you use tea bags, adding more of them can help increase the amount of flavor compounds in the brewed tea, creating a more concentrated green or white tea flavor. Avoid steeping the teas for too long; steeping teas longer than the recommended time results in the extraction of more bitter compounds. This over-extraction will create a more bitter tea base. The same caution equally applies to loose leaf teas.

If you use loose leaf teas, multiple infusions will help concentrate the flavor without the risk of over-extraction. A proper method for multiple infusion involves steeping a large amount of tea leaves for 20 – 45 seconds in just enough hot water to cover the leaves. The brewed tea is removed, and another small amount of hot water is added to the leaves and steeped for another short amount of time. This can be repeated 3 – 15 times, depending on the type of tea. This method uses twice the amount of tea leaves with half the amount of hot water [1], essentially concentrating the flavor compounds that diffuse out of the tea leaves. Multiple infusions may not be as effective with tea bags; the tea fannings used for tea bags have small surface areas, and so most, if not all, of the flavor compounds will have quickly diffused into the water in the first steeping.

Sugar can be added to the boiling water before or after steeping the tea, as long as the sugar source completely dissolves. Typically, 1 cup of sugar is added for every 4 cups of boiled water.

2. First fermentation.

Once the tea is finished steeping and the sugar is dissolved, remove the tea bags or strain out the leaves – this is the completed tea base. Tossing the SCOBY (Symbiotic Culture of Bacteria and Yeast) into this freshly-completed tea base willy-nilly will negatively affect the fermentation process, as the microbes within SCOBY thrive best at specific temperatures and pH levels. To ensure a successful fermentation, the tea base has to be adjusted for temperature and pH create a suitable environment for the SCOBY.

  1. Optimum temperature. Recall that SCOBY is alive; wait for the tea base to cool down to at least below 90°F (32°C) before adding SCOBY. A hot tea base would destroy the SCOBY microorganisms, resulting in a complete lack of fermentation. Conversely, do not add SCOBY to a tea base that has been refrigerated to below room temperature, as this would encourage the microbes to go into a dormant state, leading to a very sluggish fermentation process. The optimal temperature to add the SCOBY is between 77°F (25°C) and 90°F (32°C); , as this is the range which SCOBY microorganisms such as Acetobacter and yeast grow best [2,3].
  2. Optimum pH. SCOBY bacteria are acidophiles, meaning that these bacteria thrive in acidic environments. Excluding herbal teas, the teas used for kombucha generally have low pH ranging from 2.9 to 6.3 [4,5]. While this is considered acidic, the pH of the tea base may not be at the optimal range for the Lactobacillus and Acetobacter that inhabit SCOBY, which thrive around pH 5.0 – 6.3 [6,7]. To remedy this, a starter liquid is added to the tea base, which is the liquid that the SCOBY was stored in. Since the starter liquid houses both Lactobacillus and Acetobacter, which produce acid by oxidizing sugar to lactic acid and ethanol to acetic acid, the starter contains a mixture of lactic and acetic acid at a buffered pH that is ideal for the SCOBY. In general, 1 cup of starter liquid is used for every 2 cups of tea base. If there is not enough starter liquid, then plain, store-bought kombucha can be used in lieu of the starter.

SCOBY is added to the tea base in a wide-mouthed container, often a glass jar, to allow for gas exchange and left to ferment for 7 to 10 days at room temperature. During this first fermentation, oxygen has to be abundantly available for Acetobacter, which requires oxygen to grow (it is an obligate anaerobe) [7]. However, leaving the container uncovered puts the kombucha at risk for contamination by fruit flies. Covering the jar with a tightly-woven cloth or paper towel and an elastic band can keep out fruit flies while permitting oxygen availability for the fermenting kombucha. The longer the fermentation period, the more vinegary the flavor and the lower the sugar content.

Kombucha undergoing the first fermentation. Photo credit: Amy Selleck (amyselleck/Flickr)

Kombucha undergoing the first fermentation. Photo credit: Amy Selleck (amyselleck/Flickr)

3. Remove the SCOBY.

To end the first fermenation, simply remove the SCOBY from the kombucha. From here, there are two options: reuse the SCOBY for another batch of kombucha or store it for later brewing.

Reuse: Make another tea base. For the starter liquid, it would be easiest to use the kombucha that the SCOBY was previously removed from.

Store: Store the SCOBY in a tea base/starter liquid mixture. This can be kept at room temperature for up to three weeks, depending on the volume of the storage mixture, before the microbes exhaust the nutrients. For longer storage, place the SCOBY mixture in the refrigerator. SCOBY become dormant in cold temperatures, but this does not mean the microbes cease activity altogether. Rather, in dormancy, cell division halts and the microbes’ metabolism slows significantly [9]. In storage, the SCOBY will continue to ferment its storage mixture, albeit at a slower rate than if left at room temperature. To maintain SCOBY viability, replenish the storage mixture every 4 – 6 weeks by removing 50 – 80% of the liquid and replacing that with new sweetened tea [8]. The main idea is to provide continuing fuel for the microorganisms. It is also possible to simply add ¼ cup sugar per quart of storage mixture every 4 – 6 weeks [8], but keep in mind that the dormant microbes are still carrying out cellular functions which require nutrients and water. The stored SCOBY will reduce the volume of its storage mixture, and so additional tea is required to prevent the storage mixture from drying up.

4. Second fermentation.

Pour the kombucha into bottles and cap them, leaving the bottles out at room temperature. If a flavored kombucha is desired, this is the step to add flavoring ingredients. Although SCOBY was removed at the end of the first fermentation, not all the microorganisms were attached to the cellulose matrix, especially if the microbes were newly-cloned during that previous fermentation period. There will still be kombucha microbes present to perform a second fermentation.

As this second fermentation occurs in a closed system, CO2 produced from the yeast cannot escape the kombucha as it did during the first fermentation. As a result, the kombucha becomes carbonated during this step. Further, the kombucha microbes will continue to metabolize any remaining sugar to produce lactic acid, acetic acid, ethanol, and CO2, so the kombucha will become less sweet but tangier.

After 1 to 3 days, depending on how quickly carbonation occurs, store the kombucha in the fridge. This stops fermentation and carbonation because the significantly decreased temperature causes the microbes to go into a dormant state. And voilá! You have your first batch of kombucha!

Photo credit: thedabblist (64636759@N07/Flickr)

Photo credit: thedabblist (64636759@N07/Flickr)

While making kombucha is a lengthy process that can take up to two weeks to complete one batch, and perfecting the recipe to your own taste will involve making many batches, there is perhaps nothing more satisfying than a successful and delicious kitchen experiment.

The process described in this post was based off of kombucha recipes from The Kitchn and Food52.

References cited

  1. Thoughts on Re-steeping. Teatrekker’s Blog. 22 Sept, 2013.
  2. Science of Bread: Yeast is Fussy about Temperature. Exploratorium.
  3. McGee, Harold. On Food and Cooking: The Science and Lore of the Kitchen. New York: Simon & Schuster, 1997.
  4. pH Values of Common Drinks. Robert B. Shelton, DDS MAGD.
  5. Singh, S., Jindal, R. Evaluating the buffering capacity of various soft drinks, fruit juices and tea. Journal of Conservative Dentistry, 2013; 13(3): 129-131.
  6. Rault, A. Bouix, M., Béal, C. Fermentation pH Influences the Physiological-State Dynamics of Lactobacillus bulgaricus CFL1 during pH-Controlled Culture. Applied and Environmental Microbiology, July 2009; 75(13): 4374-4381.
  7. Hwang, J. W., Yang, Y. K., Hwang, J. K., Pyun, Y. R., Kim, Y. S. Effects of pH and dissolved oxygen on cellulose production by Acetobacter xylinum BRC5 in agitated culture, 1999; 88(2): 183-188.
  8. Take a Break from Making Kombucha Tea. Cultures for Health.
  9. Lahtinen, S. J., Ouwehand, A. C., Reinikainen, J. P., Korpela, J. M., Sandholm, J., Salminen, S. J. Intrinsic Properties of So-Called Dormant Probiotic Bacteria, Determined by Flow Cytometric Viability Assays. Applied and Environmental Microbiology, July 2006; 72(7): 5132-5134.

Alice PhungAbout the author: Alice Phung once had her sights set on an English degree, but eventually switched over to chemistry and hasn’t looked back since.

Read more by Alice Phung


Better Hops & Perfect Wine

GettyImages-123518640-582x388

Agricultural geneticist and self-proclaimed “craft beer fanatic”, Sean Myles began breeding hops plants that are resistant to mildew. Other breweries are now using traditional breeding techniques to breed hopes varieties with novel flavors, changing the craft beer game. For wine lovers, there’s Linda Bisson, a yeast geneticist at UC Davis working on the winemaking issue of “stuck” fermentation, a phenomenon when yeast added to wine fail to fully ferment.
Read more

Kombucha Brewing: The Ingredients

Photo credit: thedabblist (64636759@N07/Flickr)

Kombucha with SCOBY. Photo credit: thedabblist (64636759@N07/Flickr)

Craving some kombucha without the grocery store prices? Why not try brewing your own kombucha? As a fermented tea drink that is brightly effervescent, deliciously tangy, and slightly sweet, having some kombucha on hand could add a little spring to these cold seasons. On top of that, the brewing and fermentation involved in kombucha-making requires a little scientific know-how and quite a bit of trial and error to perfect the flavor to your liking. Think of it as having a science experiment in your kitchen!

At first glance, making kombucha appears fairly simple, as there are only four basic ingredients that go into it: water, tea, sugar, and a “Symbiotic Colony of Bacteria and Yeast,” SCOBY. If a flavored kombucha is desired, specific flavor ingredients can be added too. A cursory investigation into each ingredient, however, may bring up some questions. What type of tea makes the best-tasting kombucha? What is SCOBY and where can you source it? Is it possible to brew a sugar-free kombucha? Here is your scientific guide to making kombucha. We provide some scientific information regarding each component to help make an informed decision in choosing the ingredients that would create the kombucha that best aligns with your preferences.

SCOBY

What is it?

SCOBY is the most important component of kombucha, since it is the only thing standing between ordinary, sweetened tea and kombucha. Other fermented foods which utilize a similar symbiotic culture include kefir, ginger beer, vinegar, and sourdough. SCOBY is a grayish-white or beige, squishy mass floating within the brewed culture, and it is responsible for the distinct vinegar-like flavor, trivial alcohol content, and characteristic carbonation of kombucha. However, to call this leathery, stringy mat a symbiotic colony of microbes is a scientific misnomer. Biologically, a colony implies a coexisting group of individuals within the same species; a microbial colony is a cluster of microorganisms which have descended from a single cell, a common ancestor. SCOBY, on the other hand, is a symbiosis of multiple bacterial and yeast species cohabiting a cellulose matrix [1]. It may be more accurate to describe SCOBY as a biofilm, a colony of several microbial species attached to one another on a surface.

SCOBY

A symbiotic culture of bacteria and yeasts. Photo credit: Robert Anthony Provost (twon/Flickr)

As the name implies, SCOBY is alive. A study on the microbial populations existing in SCOBY reveals that the bacterial genus Gluconacetobacter is the most abundant [1]. Gluconacetobacter is responsible for the biosynthesis of the cellulose matrix that the SCOBY microbial population resides within. In other words, this genus of bacteria enables easy handling by creating the solid, stringy, floating mass that SCOBY is visually famous for. The next most abundant SCOBY bacteria belong to the genera Acetobacter and Lactobacillus [1], both of which give kombucha its acidic, vinegary taste by oxidizing ethanol to acetic acid and sugar to lactic acid, respectively. The yeast population of SCOBY primarily consists of the genus Zygosaccharomyces [1], which is notable for its high sugar, high alcohol, and high acid tolerance [2]. Yeasts in SCOBY generate CO2 and thus provide carbonation; they also produce alcohol, some of which is metabolized by Acetobacter into acetic acid. It is worth noting that the microbial composition of SCOBY may vary over time [1], possibly due to rapid growth, contamination, and/or random mutations. This compositional change may lead to flavor differences among different batches that have used the same SCOBY.

Where do I get it?

Home-brewing stores and online marketplaces are the more common places to buy SCOBY. For the more ambitious, there is also the option to culture SCOBY at home. Given that it is a collection of living organisms, you need to start with some pre-existing collection of kombucha microbes.

To make SCOBY at home, a modest amount of store-bought or homemade, unflavored and unpasteurized kombucha is required. Kombucha often contains a small amount of SCOBY left behind from the brewing process. To begin, place about 1 cup of kombucha with 7 cups sweet tea in a covered container and store for 1 to 4 weeks. In storage, the SCOBY microbes multiply and aggregate, with Gluconacetobacter synthesizing the cellulose that enables the microorganisms to grow together in that signature rubbery mass. For more detailed instructions, check out The Kitchn’s recipe for home-grown SCOBY.

Teas

Which tea?

Kombucha would not be kombucha without tea, but with so many varieties and forms to choose from, it’s easy to get lost. In general, teas are categorized by how the tea leaves (from the plant, Camellia sinensis) were processed, which affects the flavor, caffeine content, and color of the brewed liquid. Varieties among the basic tea categories arise from the geography of C. sinensis, growing conditions, time of harvest, and production processing, giving rise to notable flavor differences. The type of tea chosen will influence the prominent flavor profile of the finished kombucha. For the adventurous, different teas can be mixed together to create a unique kombucha flavor base.

Left to right: green tea, yellow tea, oolong tea, and black tea. Photo credit: Haneburger (Wikimedia Commons)

Left to right: green tea, yellow tea, oolong tea, and black tea. Photo credit: Haneburger (Wikimedia Commons)

  • Black: The most common choice for brewing kombucha, black teas undergo full enzymatic oxidation during production, which gives the drink a dark brown color [3]. Furthermore, complete oxidation of the tea leaves gives black teas a deep malt, caramel, or toasty flavor. This rich tea flavor enables a quick brew without flavor loss during kombucha fermentation.
  • Oolong: Literally translating to “black dragon tea”, oolong teas are partially oxidized, ranging from 8-85% oxidation depending on the tea producer. Oolong flavor profiles fall between the robustness of black teas and the delicacy of green teas, with tones ranging from smoky and buttery to floral and fruity, depending on the amount of oxidation the tea leaves were processed.
  • Green: During production, the oxidation process is stopped early; the tea leaves undergo minimal oxidation, giving green tea a more grassy, floral flavor when compared to other types of teas [3]. Due to their light and subtle flavors, green teas may have to be steeped many times for full flavor, and kombucha with a green tea base may have to be brewed longer.
  • White: Unlike the other teas, white teas are made using only the buds of the C. sinensis plant. Additionally, some white tea varieties use buds that have been steamed or baked, which inactivates enzymatic oxidation. The minimal or absence of oxidation gives white teas a very delicate and subtle grassy flavor, and so this tea may have to be steeped multiple times and a kombucha with a white tea base may have to be brewed for a long time.
  • Pu-erh: Pu-erh stands apart from other teas that use sinensis leaves by an additional fermentation step after the leaves are dried. Fermenting the tea leaves gives pu-erh teas a complex, sweet, earthy flavor profile that the other teas do not have [3].
  • Herbal: Unlike the above four categories, herbal teas rely on steeping plant parts that do not come from sinensis. Herbal teas are strongly advised against for kombucha brewing, as the plants that are used often contain volatile oils that have anti-microbial and/or anti-fungal activity. Some common anti-microbial volatile oils found in herbal teas include lavender oil (from lavender teas), peppermint oil (peppermint teas), and eugenol oil (chai teas) [4], all of which can destroy the bacteria and yeast in SCOBY. A damaged SCOBY will not be able to ferment or carbonate the kombucha batch.

Loose leaf or tea bags?

Tea bags are cheaper and easier to find at the grocery store, but tea bags typically contain fannings or tea dust, which are broken remnants of tea leaves. These remnants were either purposefully crushed for packaging into tea bags or are the leftover fragments after the loose leaf teas are packaged. In contrast, loose leaf teas cost more than their tea bag counterparts and are primarily found in tea specialty stores, but the leaves are much bigger than the fannings found in tea bags. The primary difference between loose leaf and tea bags are the size of the tea leaves, which will affect taste and brew time. Tea leaf sizes do not always correlate to the quality of the tea [5].

Where tea brewing is concerned, fannings have a much greater surface-area-to-volume ratio due to the small particle size, and so will brew much quicker than loose leaf teas. Furthermore, crushed tea leaves may increase the strength of the brewed tea [5]. However, loose leaf teas generally offer more complex, nuanced flavor profiles which tea bags lack. The form of tea to use for brewing kombucha overall depends on personal taste preferences.

Sugar

Which sugar?

At first glance, white sugar seems like the only option, given its ubiquity. For those wishing to experiment a little further, there is no reason to try other sugar sources, since the sugar-metabolizing microbes in SCOBY are not sucrose-specific. There are a couple of notes to consider when choosing the type of sugar:

Brown sugar is sucrose sugar that contains molasses, which may add a molasses flavor to the kombucha.

Raw sugar tend to have bigger crystals, since it is less refined. Bigger sucrose particles may affect its ability to completely dissolve in the kombucha, especially at or below room temperature. If the sugar crystals are not completely dissolved, there may be less sugar in solution available for the bacteria and yeast to metabolize. This could perhaps lead to a more yeasty, rather than fizzy kombucha.

Honey is a mixture of glucose and fructose, with its golden color deriving from non-sugar components such as pollen. Other microorganisms may also be found in honey [6], so using honey for brewing kombucha runs the risk of microbial contamination which may affect SCOBY efficacy.

Sugars extracted from plants or trees other than beets and sugar canes are fair game for brewing kombucha. A few examples include maple syrup, coconut sugar, and palm sugar. Agave nectar, despite health claims, contains a higher fructose content by weight than high fructose corn syrup [7].

Sugar substitutes, such as stevia, xylitol, and glycerol, are sugar alcohols. SCOBY is unable to metabolize sugar alcohols, and so adding artificial sweeteners would not be effective at all in brewing kombucha.

How much sugar?

In kombucha, sugar is used as a food source for the SCOBY, not as a sweetener as in many other recipes. The end product has far less sugar than was originally added to the first fermentation period, as the SCOBY has metabolized most of it to create the vinegary flavor and carbonation. Therefore, adding sugar is necessary for successful fermentation.

Too little sugar, and the SCOBY does not have the necessary fuel to undergo prolonged fermentation, leading to an unsweet, not very acidic, and possibly flat kombucha. Too much sugar may cause the yeast to over-proliferate, outnumbering the other SCOBY microbes. This both decreases the efficacy of the SCOBY and decreases the flavor and carbonation of the resulting kombucha. The exact amount of sugar varies among recipes, and can be experimented with to suit personal preferences.

Flavorings

For a more unique kombucha, flavors are often added near the end of the kombucha brewing process, after the batch has undergone its initial fermentation period. Just like every other component that goes into kombucha, the choices for flavoring are abundant.

Herbs and spices: Since herbs and spices tend to have strong flavors, adding a little bit can go a long way. Keep the amount to a minimum, as some herbs and spices may contain antimicrobial activity, and adding too much may harm the microbes on SCOBY, making the second fermentation period unlikely to occur successfully.

Fruits: Whether fresh fruit or fruit juice is used, be sure to keep an eye on the batch after adding the fruits. Fruits and fruit juices introduce an extra sugar source for the SCOBY during the second fermentation period; the yeast cultures in the SCOBY go into “overdrive” with this added amount of sugar. While this may lead to a fizzier kombucha, the increased carbonation will create a pressure-build up within the container. Opening the container may risk a small kombucha explosion or the container may burst open from the pressure built up.

Kombucha flavored with raspberries. Photo credit: Lukas Chin (Wikimedia Commons)

Kombucha flavored with raspberries. Photo credit: Lukas Chin (Wikimedia Commons)

Extracts and infused waters: Like herbal teas, be sure that the extracts are oil-free as to avoid volatiles that contain anti-microbial activity. A few examples of water-based extracts would be lemon extract (not lemon oil), almond extract, and vanilla. Infused waters include rose water and orange blossom water.

With a little bit of background knowledge, kombucha brewing could become your favorite science project. Explore the possibilities!

References cited

  1. Marsh, A. J., O’Sullivan, O., Hill, C., Ross, R. P., Cotter, P. D. Sequence-based analysis of the bacterial and fungal compositions of multiple kombucha (tea fungus) samples. Food Microbiology, April 2014; 38:171-178.
  2. C. Fugelsang, “Zygosaccharomyces, A Spoilage Yeast Isolated from Grape Juice.”
  3. Types of Tea. TeaSource. 2013.
  4. Thosar, N., Basak, S., Bahadure, R. N., Rajurkar, M. Antimicrobial efficacy of five essential oils against oral pathogens: An in vitro European Journal of Dentistry, Sept 2013; 7:71-77.
  5. Does the size of your tea leaf matter? Octavia Tea. 18 November, 2011.
  6. Olaitan, P. B., Adeleke, O. E., Ola, I. O. Honey: a reservoir for microorganisms and an inhibitory agent for microbes. African Health Sciences, Sept 2007; 7(3):159-165.
  7. Bowden, Jonny. Debunking the Blue Agave Myth. Huffington Post. 17 April, 2010.

Alice PhungAbout the author: Alice Phung once had her sights set on an English degree, but eventually switched over to chemistry and hasn’t looked back since.

Read more by Alice Phung