Tag Archive for: scienceandfood

Elaine Hsiao

Elaine Hsaio

Dr. Elaine Hsiao is an assistant professor at UCLA’s Department of Integrative Biology & Physiology and UCLA’s Department of Medicine, Digestive Diseases. In addition to her many distinctions, she was elected to the Forbes’ 2014 “30 Under 30 in Science & Health Care” and served on the White House Office of Science and Technology Microbiome Forum. Her research studies how changes to microbes inside our bodies impact our health and behavior and may influence various neurological disorders like autism, depression, and Parkinson’s disease.

See Dr. Elaine Hsiao speak on May 11 2016 at “Microbes: From Your Food to Your Brain”

Check out some of her previous talks and interviews

TEDXCaltech – “Mind-Altering Microbes: How the microbiome affects brain and behavior”

In her talk, Dr. Hsiao explains how the microbes in our gut can affect our brains by altering our production of neuroactive molecules and the potential applications of this research

Media Evolution – “Brain, Heart, gut – what drive us, really”

Here Dr. Hsiao shows how mouse models are used in her research. Specifically, she explains how she and her team experimentally determined gut microbes influence autistic-like behaviors in the mice.

Autism Speaks – “Investing in Talent: Predoctoral Fellow Elaine Hsaio”

In this interview, Dr. Hsiao talks about her previous work investigating how infections during pregnancy impact the risk of Autism.

For more information check out her Lab’s Website here

Inside the Experimental Cuisine Collective

Untitled

Robert Margolskee, Mitchell Davis, Florence Fabricant, Wylie Dufresne, and Hervé This at the Experimental Cuisine Collective’s launch workshop on April 11, 2007. Photo credit: Antoinette Bruno (Star Chefs)


Launched in 2007, the Experimental Cuisine Collective (ECC) has proven itself as an invaluable resource for those interested in learning about the scientific principles behind food. Founded by Drs. Kent Kirshenbaum and Amy Bentley of New York University in collaboration with Chef Will Goldfarb of WillPowder, the ECC hosts workshops approximately five times per year, each featuring different topics and/or speakers. ECC’s current Director is Anne McBride, a PhD candidate in Food Studies at NYU and Culinary Program/Editorial Director for the Culinary Institute of America. Widely recognized for her ability in establishing connections between scientists and chefs, McBride has been instrumental in developing ECC’s programs. ECC’s workshops have gained nationwide acclaim, featured in media outlets such as Serious Eats, New York Observer, and even the Food Network!

The impressive roster of past ECC speakers include renowned chefs and scientific minds such as Dan Barber, Wylie Dufresne, Rachel Dutton, and Mark Bomford. The topics of ECC workshops are also interestingly diverse, covering topics from soda politics with Marion Nestle to cooking insects with the Yale Sustainable Food Project to the New York Academy of Medicine’s Eating Through Time conference.

Our recent Science & Food public event featured Dr. Kent Kirshenbaum , who stopped to answer a few questions for us about the ECC:

What motivated you to start the Experimental Cuisine Collective?
I was asked by the National Science Foundation to consider establishing a science outreach program as part of their emphasis on “Broader Impacts” of scientific research. I’ve always been eager to establish connections between scientists and experts from other disciplines, so exploring the terrain between chemistry and cuisine came about very naturally.
What has been one of your most memorable experiences since founding the site?
The Experimental Cuisine Collective has always been more about direct engagement rather than as a web-based portal for information. One of my most memorable experiences with the ECC was preparing an alginate-based mango-juice pearl with a 4th grade student at a science fair.  I asked her if we were doing science or cooking. After a moment’s careful thought she replied, “I guess it’s both!” That was a very satisfying moment.

Another memorable experience was giving a lecture series about the ECC throughout New Zealand during the “International Year of Chemistry”. The director of the ECC, Anne McBride, and I got the chance to prepare what we believe were the world’s first vegan pavlovas for our audiences throughout New Zealand. We love Kiwis!

What do you hope the Experimental Cuisine Collective’s readers take away from the website?
I think they are excited about the lecture programs we are offering at NYU, and the opportunity to learn what science can contribute to cooking — along with how chefs can advance scientific objectives. Plus, I hope readers are quick to appreciate that we have been offering our programs for almost 10 years, and all of it has been completely free of charge!
Are there any upcoming projects you would like people to know about?
Our upcoming meeting will be devoted to hydroponic farming, in partnership with the Institute of Culinary Education. We will be meeting at ICE’s indoor 540-square-foot farm in lower Manhattan, designed by Boswyck Farms, which has 3,000 plant sites and in which 22 crops are currently growing. The amazing thing about this farm is that it is literally across the street from the tallest building in the Western Hemisphere. Science can help us grow in so many ways and places!

Ashton YoonAbout the author: Ashton Yoon received her B.S. in Environmental Science at UCLA and is currently pursuing a graduate degree in food science. Her favorite pastime is experimenting in the kitchen with new recipes and cooking techniques.

Read more by Ashton Yoon


The Keys to Cheese: Does This Cheese Melt?

Melted Cheese [Photo Credit: Pittaya Sroilong]

Melted Cheese Frize [Photo Credit: Pittaya Sroilong]

Whether you are making cheese fries, grilled cheese sandwiches, quesadillas, baked cheese bites, or homemade mac and cheese, choosing the right type of cheese can make or break these comfort foods. The key to all of these dishes is cheese that produces an even and homogenous melt. Cheeses like Cheddar, Mozzarella, and Gruyere are used often. If you aren’t feeling adventurous, you could just memorize the names of these greatest hits. However, if you want to experiment and change the melty cheese game, you’re going to have to understand why these cheeses work.

Let’s first examine what happens to cheese as it melts. The interactions of casein (milk proteins) and calcium help define its solid structure. When solid, caseins are bound together in large branching porous protein networks that entrap milkfat and water. Calcium (as calcium phosphate) acts as a bridge to stabilize these networks. When you apply heat to a cheese, melting occurs in two stages. First, at around 90 ˚F, milkfat is released1. This is because hydrophobic (water-repulsive) interactions between casein molecules increase under heat2. These interactions force out water molecules and the space between casein molecules increases allowing milkfat, which melts at this temperature, to escape. If you’ve put cheese on a burger that’s being grilled, you may see little sweat beads of liquid form on the cheese in the early stages of melting. The second stage happens at about 40 to 90 degrees higher, at around 130 – 180˚F3. At this point, the casein proteins do not break down, but rather, the increased movement of the proteins, resulting from the heat, allows for the proteins to act more fluid-like and the cheese melts.

There are many factors that control melting and explain why melting temperatures vary by as much as 50 degrees. No one factor defines a cheese’s melting properties as these factors can interact.

Moisture and Fat

Cheese with higher moisture and fat content tends to have lower melting points. For example, high moisture cheeses like Mozzarella melt around 130 ˚F and low moisture cheeses like Swiss melt at 150 ˚F 2. First, as previously highlighted, the milkfat and water portion of the cheese react to heat at lower temperatures than the proteins. Accordingly, with more moisture and fat present in a cheese, greater proportions of the cheese are susceptible to melting at lower temperatures. When the fat becomes liquid, it can no long provide support for the protein networks. Secondly, increased moisture and fat means that the casein proteins are more spread out and the mesh size (gap between proteins) is larger. This means there are fewer connections (bound calcium bridges) between proteins networks making melting more likely to occur at lower temperatures.

You may not know the exact moisture and fat content of every cheese variety without looking at a label, but intuitively, softer cheeses have more moisture and fat. Additionally, younger cheeses generally have more moisture so they also tend to melt more uniformly and evenly.

Acid Content

Chesses typically melt homogenously and evenly around a pH of 5.0 – 5.44. This is related to the calcium bridges. At too high a pH (pH > 6), too much calcium is present as bound calcium phosphate and the protein is too tightly bound to melt. With lowered pH, the calcium phosphate bound to the casein is replaced by hydrogen (H+), allowing for more movement among proteins.2 At around a pH of 5.0 – 5.4, there is a sufficient number of calcium present as bridges to allow for melting. At too low a pH (pH < 4.6), too many calcium bridges are lost and proteins aggregate and are unable to flow and melt evenly.

Lastly as a caveat, the factors being highlighted are specific to rennet-set cheeses, and not acid-set cheeses. Acid-set cheeses like queso fresco, paneer, and ricotta are not generally used, as they don’t produce even melts4. This results from the way they were made. In cheese making, you have two options for separating the solid curds (primarily casein proteins) and the liquid whey; Use rennet (an enzyme derived from the intestines or baby goats and cows) or use an acid (like vinegar or lemon juice).

When they are free floating in liquid milk, casein proteins have a slightly different molecular structure than when they are in cheese. In milk, caseins stick together in small clusters (micelles) that have negative charges on their surface. Since negative charges repel each other, these micelles won’t combine. Adding acid to heated milk lowers the pH, which neutralizes the negative charges on the micelles; therefore the casein micelles can aggregate. In contrast, using rennet to set cheese is a more targeted approach. In this process, an enzyme contained in rennet called chymosin, selectively removes negatively charged portions of the casein micelles and allows the micelles to clump.

In an acid-set cheese, calcium bridges are never formed as a result of the acidic environment used to generate the cheese5. These cheeses are only held together in protein aggregates rather than protein networks with calcium bridges and don’t produce the even melt desired.

Bottom Line:

Rennet-set cheeses with high moisture and fat are the best cheeses for melting as they melt evenly and consistently.

But don’t fret if you still want to harness the flavor of other cheeses (especially older or drier cheeses)! You have options: Try using a cheese blend with a higher proportion of the better melting cheeses and a small proportion of the other cheeses. For example, this recipe uses a 1:4 ratio. Experiment! You now know the keys for melty cheese!

References cited

  1. Schloss, Andrew and David Joachim. “The Science of Melting Cheese” http://www.finecooking.com/item/64019/the-science-of-melting-cheese
  2. Johnson, Mark. “The Melt and Stretch of Cheese” https://www.cdr.wisc.edu/sites/default/files/pipelines/2000/pipeline_2000_vol12_01.pdf
  3. Mcgee, Harold. On Food and Cooking. 2004 “Cheese” (57 – 67).
  4. Tunick, Michael. The Science of Cheese. 2013 “Stretched Curd Cheeses, Alcohols, and Melting” (82 – 91).
  5. Sargento Food Service. “Cheese Melt Meter” http://www.sargentofoodservice.com/trends-innovation/cheese-melt-meter/
  6. Achitoff-Grey, Niki. “The Science of Melting Cheese” http://www.seriouseats.com/2015/08/the-science-of-melting-cheese.html

Vince ReyesAbout the author: Vince Reyes earned his Ph.D. in Environmental Engineering at UCLA. Vince loves to explore the deliciousness of all things edible.

Read more by Vince Reyes


Harnessing Creativity

Harnessing Creativity

Featuring Dave Arnold & Chef Lena Kwak

June 1, 2014

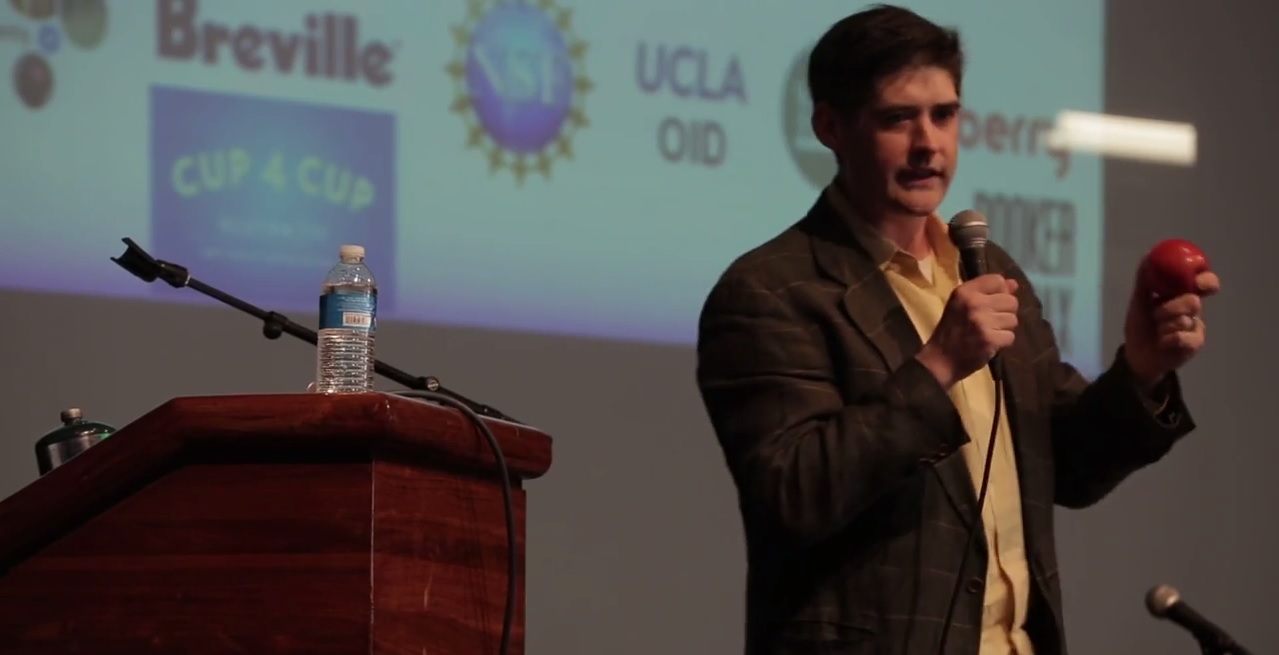
As part of our 2014 public lecture series, Dave Arnold (of Booker and Dax, the Museum of Food and Drink, and the Cooking Issues Podcast) discussed his latest culinary innovations and the role of creativity in food. He was joined by Chef Lena Kwak (of Cup4Cup) who shared her process of invention, research, and discovery in the kitchen.

Check out the highlights or watch the full lecture below.

Lena Kwak on the creation of Cup4Cup and the power of mistakes

“It was working with food that helped me get over the fear of imperfection. Making mistakes in the kitchen played a significant role in my recipe development. I found myself more daring [and] willing to experiment with different flavors and texture combinations…Take Cup4Cup. The original formula took me about year-and-a-half to finalize. A year-and-a-half is a very long time to make a lot of mistakes…. All the knowledge I gained through those mistakes has actually left me with [another] set of different products.”

Her biggest words of advice: “Go out there, makes mistakes—because you never know what those mistakes will lead you to.”

Dave Arnold on how to be creative in the kitchen

“What is important isn’t that you use a piece of technology or that you use a new piece of equipment. Really it’s that you try to understand what is going on while you’re cooking…. It’s to become unhinged in a very analytical way… that’s the whole premise of creativity.”

Dave Arnold uses gymnemic acid to flip our understanding of sweet foods

Dave Arnold gives the audience gymnemic acid to block their sweet taste receptors and then challenges them to try sweet treats like sugar, honey, strawberries and chocolate. He explains that erasing sweetness enables the taster to examine how other factors like texture and acidity influences the experience of sweet foods.

Arnold says this analytical approach to food is important: “Even if you have no idea why something happens, if you have a hypothesis … and you keep adapting and recording what your results are… you can get to the right place.”

Watch the entire lecture:

Baking Science & Tasting Colors

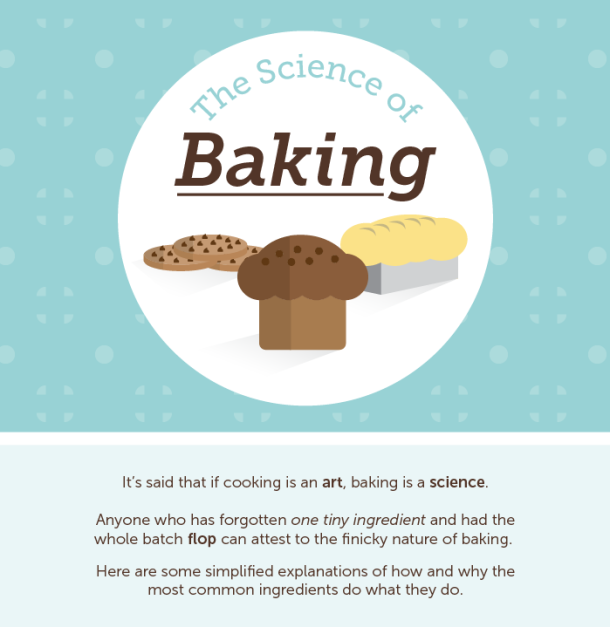
Science of Baking Infographic

The folks over at Shari’s Berries were kind enough to send us a detailed infographic on baking science. Meanwhile, there are some folks  who can actually taste colors.
Read more

Crumbalicious Apple Pie

The Science of Pie – June 1, 2014
Best Overall Pie & People’s Choice Pie
Alina Naqvi & Ashley Lipkins-Scott (Team Apple Queens)

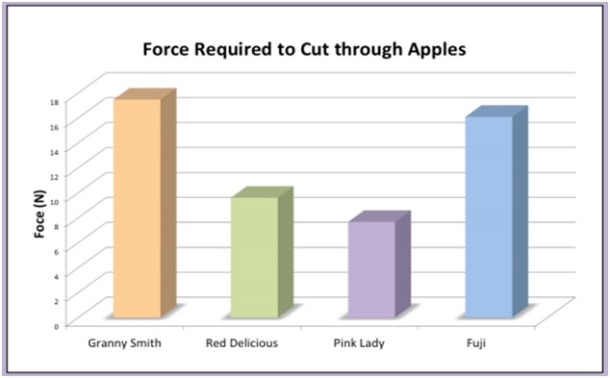
This duo of student scientists aimed to create a pie with the crunchiest apple filling by experimenting with four different types of apples: Granny Smith, Red Delicious, Pink Lady, and Fuji. To determine which apples had the greatest resistance to applied forces (and thus remained crunchiest), they measured both the force required to cut through each kind of apple and the “elastic modulus”, which is the amount of deformation caused by a given force.

(A) Team Apple Queens receives the People’s Choice Award at the 2014 Xcience of Pie event. (B) Lipkins-Scott carries the team’s cinnamon crumb pie to the oven. (C) Fuji and Granny Smith apples were used for the Apple Queens’s pie because the team found that these apple varieties had the highest values for elastic modulus. Photos courtesy of Patrick Tran.

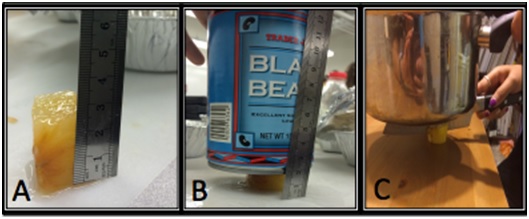
To measure the elastic modulus for each apple variety, the team applied a known weight to the apple slice and measured the deformation using a ruler before and after the apples were cooked. (See Panel A & B below). In addition, they wanted to see which apples had the most resistance (and thus, crunch) by measuring the force used to cut through the apples in a “Puncture Force” Test. For this test, the team added increasing volumes of water into a pot balanced over a knife to determine the mass of water required for the knife to cut through the apple slice. (See Panel C below).

After the apples are baked, their lengths (A) and deformations (B) are measured to obtain the elastic modulus. (C) The Puncture Force Test measures the force required to cut through the cooked apples.

Before baking, the Fuji apple had the highest elastic modulus of 170,000 N/m2 and the Pink Lady had the lowest elastic modulus of 130,000 N/m2. After baking, the Granny Smith had the highest elastic modulus of 32,000 N/m2 and the Fuji had the second highest elastic modulus at 28,000 N/m2.

In the Puncture Force Test, the baked Granny Smith apple required the highest puncture force of 18N.

Team Apple Queens found that the cooked Granny Smith apples exhibited the highest elastic modulus and also required the greatest force to cut through. Thus, the Granny Smiths were most resistant to external pressure and remained the crunchiest after baking. Having both the second highest elastic modulus and the second greatest puncture force were the Fuji apples. Based on these results, the team hypothesized that Granny Smith and Fuji apple varieties may contain more of the polysaccharide pectinto fortify their cell walls and make them harder, crunchier apples.

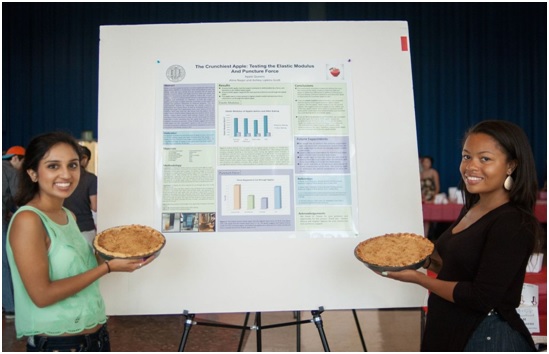
The students of Team Apple Queens stand proudly by their winning pie and poster.

Recipe
Crumbalicious Apple Pie

For the crust:
1 1/3 cup all purpose flour
1⁄2 teaspoon salt
1⁄4 cup (1/2 stick) chilled unsalted butter, cut into 1⁄2-inch cubes
1⁄4 cup frozen solid vegetable shortening, cut into 1⁄2-inch cubes
3 tablespoons (or more) ice water
1⁄2 teaspoon apple cider vinegar

For the filling:
3 Granny Smith apples, peeled, cored, and sliced 1⁄4 inch thick
1 Fuji apple, peeled, cored, and sliced 1⁄4 inch thick
2/3 cup cane sugar
2 tablespoons all purpose flour
2 teaspoons ground cinnamon
2 tablespoons unsalted butter, melted

For the topping:
1 cup all purpose flour
1⁄2 cup cane sugar
1⁄4 cup brown sugar
1 and 1⁄2 teaspoons ground cinnamon
1⁄2 teaspoon salt
6 tablespoons chilled unsalted butter, cut into 1⁄2-inch cubes

Position a rack in the center of the oven and preheat to 375°F.

To prepare the crust:
In a large bowl, mix flour, salt, and sugar. Add butter and shortening; rub in with fingertips until coarse meal forms. We want to incorporate flattened sheets of butter into the flour mixture to get a flaky crust.

In a small bowl, mix three tablespoons of ice water and vinegar. Drizzle the water and vinegar solution over flour mixture. Stir with fork until moist clumps form, adding more water by teaspoonfuls if dough is dry.

Gather dough into ball; flatten into disk. Wrap in plastic and refrigerate for at least 30 minutes. Refrigeration is important for allowing gluten strands to relax (so the dough becomes easier to roll out), and for letting letting liquids incorporate to moisturize the dough.

Roll out dough on lightly floured surface to 12-inch round. (About 1/8th 9-inch-diameter glass pie dish.) Trim overhang to 1/2 inch; turn edge under and crimp decoratively.

Refrigerate while preparing filling and topping.

To prepare the filling:
Mix all ingredients in a large bowl to coat apples.

To prepare the crumble topping:
Blend all ingredients until mixture resembles wet sand.

To assemble the pie:
Toss the filling to redistribute juices and then transfer to crust, mounding in center. Pack topping over and around apples. Bake pie on baking sheet until topping is golden, about 1 hour (cover top with foil if browning happens too quickly). Cool until warm, about 1 hour.

Recipe adapted from Bon Appétit: Cinnamon Crumble Apple Pie


Eunice LiuAbout the author: Eunice Liu is studying Neuroscience and Linguistics at UCLA. She attributes her love of food science to an obsession with watching bread rise in the oven.

Read more by Eunice Liu


Perfectly Unsoggy Apple Pie

The Science of Pie – June 1, 2014
Honorable Mention Pie
Alexis Cary & Matthew Copperman (Team On the Road)

If you’ve baked an apple pie, you have probably encountered the dreaded problem of a soggy pie crust.

The student scientists of Team On the Road sought to solve this pie-baking mishap by determining the optimal apple slice thickness; the idea was that apple slices of varying thickness would release different  amounts of water when baked, with more water released giving rise to a soggy crust. To investigate the effect of apple slice thickness, they cooked apples of different slice geometries, and measured the “elastic modulus”, which is how much the apple pieces deform in response to a given applied mass.

Team on the Road

(A) Copperman rolls out the pie crust while Cary prepares ingredients. (B) The team presents their pie and poster at the 2014 Science of Pie event. (C) The team tested the elastic modulus of apple slices of varying thicknesses. Photos (A) and (B) courtesy of Patrick Tran. Photo (C) courtesy of Team On the Road.

The team prepared five different samples of apple slices with thicknesses: 3mm, 6mm, 9mm, 12mm, and 15mm. The apples of each thickness group were recorded for mass and elastic modulus before and after being baked for 20 minutes at 375°F.
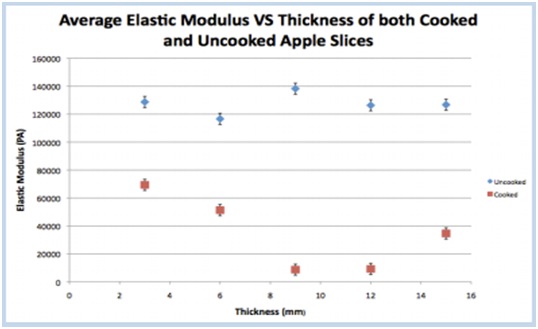
Avg Elastic Modulus vs. Thickness of Cooked & Uncooked Apple Slices

The elastic modulus is shown as a function of slice thickness for uncooked (blue) and cooked (red) apples.

The thinnest apple slices (3mm) had the least change in elastic modulus. In fact, as the slices increased in thickness, they showed increased deformation in apple shape and texture after cooking. There is an exception for the thickest apple slice (15mm), which the team attributes to the thickest apples not being fully cooked in 20 minutes. Because the thinnest apple slices maintained their firm texture and released the least amount of water, Team On the Road used extremely thin apple slices in their final pie. Soggy pie crusts, begone! Thin apple slices are here to save the day!

Note: While the team cut their slices by hand, we recommend using a mandoline to achieve uniformly thin slices of applies.

Recipe
Perfectly Unsoggy Classic Apple Pie

For the crust:
2 1/2 cups unbleached all-purpose flour, plus extra for dusting
2 tablespoons granulated sugar
1 teaspoon table salt
4 tablespoons cold vegetable shortening, cut into 8 pieces
16 tablespoons cold unsalted butter, cut into 16 pieces
6 – 8 tablespoons ice water

For the filling:
3/4 cup granulated sugar
2 tablespoons all-purpose flour
1 teaspoon lemon zest from 1 medium lemon
1/4 teaspoon table salt
1/4 teaspoon ground nutmeg
1/4 teaspoon ground cinnamon
1/8 teaspoon ground allspice
1 lemon’s worth of lemon juice
2 pounds Granny Smith apples, peeled, cored, and sliced as thin as possible (approx. 1/8” is as small as this team consistently achieved.)
1 pounds Gala apples, peeled, cored, and sliced the same as the Granny Smith Apples

For assembly:
1 egg white, beaten lightly
1 tablespoon granulated sugar, for topping
Adjust oven rack to lowest position, place rimmed baking sheet on rack, and heat oven to 400 °F.

To prepare the crust:
Process flour, sugar, and salt together in food processor until combined, about 5 seconds.  Scatter shortening over top and pulse mixture for 5 times, 2 seconds each pulse.

Scatter butter over top and pulse mixture until it resembles coarse crumbs, about 10 pulses.  Transfer mixture to large bowl.

Add 3 tablespoons ice water over the mixture. Stir and press dough together. (The team used a stiff rubber spatula.)  Add 3 more tablespoons of water and mix until dough sticks together. Continue to add remaining ice water, less than 1 tablespoon at a time, as needed until the dough comes together.

Divide dough into two even pieces. Next, it is very helpful to lightly flour counter, hands, and rolling pin. Roll out dough into 12-inch diameter circles and transfer one of the circles into pie pan.  Let excess dough hang over the edge.  Press dough lightly into the bottom, corners and edges of pan.

Wrap in plastic wrap and refrigerate for at least 1 hour. Wrap the other pie crust dough in plastic wrap and refrigerate.   Refrigeration is important for allowing gluten strands to relax (so the dough becomes easier to roll out), and for letting letting liquids incorporate to moisturize the dough.

To prepare filling:
Mix sugar, flour, lemon zest, salt, nutmeg, cinnamon, and allspice together in large bowl.  Add lemon juice and apples and toss until combined.  Let apples sit in mixture for 5-10 minutes.

To assemble the pie:
Remove pie dough from refrigerator.

Pour apples into the dough-lined pie pan, adding about half of the liquid from the apple mixture to the pie pan. Spread apples so that they create a slight mound in the middle.

Loosely roll remaining dough round around rolling pin and gently unroll it onto filling. Trim overhang to 1/2 inch beyond lip of pie plate. Pinch edges of top and bottom crusts firmly together, pressing overhanging dough towards the pie pan until it lies flush with the pan.

Crimp dough evenly around edge of pie using your fingers. Cut a 2-inch “X” into the upper crust. Brush surface with beaten egg white and sprinkle evenly with remaining 1 tablespoon sugar.

Place pie on heated baking sheet, and bake for 30 minutes. Rotate pie and bake for an additional 30 minutes. Crust should be golden brown. If necessary cook for up to 10 minutes longer.

Let pie cool on wire rack. Serve at room temperature.


Eunice LiuAbout the author: Eunice Liu is studying Neuroscience and Linguistics at UCLA. She attributes her love of food science to an obsession with watching bread rise in the oven.

Read more by Eunice Liu