Tag Archive for: physics

Chocolate Fountain Physics & Jell-O Composition

adam-townsend-chocolate-fountain-1024x538

Ever looked at a chocolate fountain and wondered why the flowing chocolate slopes inward, instead of falling straight down? Adam Townsend and Dr. Helen Wilson from the University College London developed mathematical equations to explain this sweet, physical phenomenon. If wobbly desserts are more up your alley, take a look at the ingredients list for Jell-O. You may be interested to know that Jell-O contains cowhide.
Read more

Maple Syrup

Photo credits: flickr/Doug

Photo credits: flickr/Doug

Nothing sets the tone for a drowsy Sunday afternoon like a breakfast that features maple syrup. This sticky and wonderful syrup fills the nooks and crannies of our nation’s waffles with the taste of autumn and the smell of Canada. Let’s take a moment to appreciate the science that makes maple syrup and its confectionery relatives the crown jewel of breakfast condiments.

Generally, syrups are made by extracting sap from plants and boiling them down so they become a more concentrated and viscous liquid. The sugar maple tree, Acer saccharum produces the sap that can eventually become maple syrup, as it produces sap in greater quantities than other maple varieties.

6963630093_c0caa97ab8_z

Optimal conditions for sap harvesting involve extreme temperature fluctuations from day to night. The northeastern United States and eastern Canada, of course, have just the night-day temperature shifts to produce quality maple sap. The traditional sap-seeker drills a small hole into the cambium, or woody tissue, of a maple tree, and inserts a spout. On warm days when temperatures are above freezing, the liquid sap expands and creates positive pressure in the xylem – the plant version of veins; this pressure pushes sap out of the tap hole and into the collection vessel. When night falls and temperatures drop below freezing, sap contracts as all liquids do when chilled. As the sap contracts, this creates negative pressure, which sucks water from the soil into the roots and the tree; this replenishes the sap that has bled out of the tap hole.

Photo Credits: flickr/Chiot's Run

Photo Credits: flickr/Chiot’s Run

After harvesting, the harvested sap is boiled down until it has a viscosity of about 150-200 centipoises – a viscosity very similar to that of motor oil. When the liquid has reached this consistency, it has undergone a 40x reduction in volume. The resulting syrup is approximately 62% sucrose, 34% water, 3% glucose and fructose, and 0.5% malic acid, other acids, and traces amounts of amino acids. The distinct and lovely aromatic notes of maple come from wood byproducts like vanillin, other products of sucrose caramelization, and products of Maillard reactions between the plant sugars and the amino acids.

Photo Credits: flickr/LadyDragonflyCC

Photo Credits: flickr/LadyDragonflyCC

Another delectable treat from Northern climates is maple sugar. Maple sugar is made by boiling maple syrup (which has a boiling temperature 25-40°F above the boiling point of water, but varies with altitude) to increase sucrose concentration, then letting the syrup cool. Left alone, the sucrose accumulates into coarse crystals that are thinly coated with the remainder of the syrup. Simply put, maple sugar is plain table sugar with a natural coating of maple flavor.

Photo Credits: flickr/cdn-pix

Photo Credits: flickr/cdn-pix

A luxury to smear on your toast or pancake, maple cream is surprisingly simple to make, and despite its name, doesn’t contain any dairy. This delicious creamy spread is a malleable mixture of very fine crystals that are dispersed in a small amount of syrup. Maple cream is made by cooling maple syrup rapidly to 70°F by immersing its container in ice water, then beating it continuously until it becomes very stiff; thereafter it is warmed until it becomes smooth and has the texture and viscosity of a runny buttercream frosting.

Photo credits: flickr/ Anne White

Photo credits: flickr/ Anne White

One last note on maple syrup – beware of imposters! If the bottle doesn’t say maple syrup, it is not maple syrup. Breakfast or pancake syrup disappointingly consists of corn syrup and artificial flavors.

Works Cited

  1. “Learn about the Science of Maple Syrup.” Cary Institute of Ecosystem Studies. N.p., 24 Mar. 2013. Web. 25 Nov. 2015.
  2. McGee, Harold. “Sugars and Syrups.” On Food and Cooking: The Science and Lore of the Kitchen. 1st ed. New York: Scribner, 2004. N. pag. Print.
  3. “Viscosity Comparison Chart.” Viscosity Comparison Chart. The Composites Store, n.d. Web. 25 Nov. 2015.

Elsbeth SitesAbout the author: Elsbeth Sites received her B.S. in Biology at UCLA. Her addiction to the Food Network has developed into a love of learning about the science behind food.

Read more by Elsbeth Sites


Chocolate’s Future & Mysteries

Twilley-Preventing-a-Future-Without-Chocolate-690

In the town of Reading, located in Berkshire, England, exists the International Cocoa Quarantine Centre, where tropical cacao plants are kept to prevent the spread of pests and diseases which threaten the world’s chocolate supply. Over at Technische Universität München, physicists have shown that molecular simulations can solve how the chocolate-making process turns bitter cacao to sweet, silky chocolate on a molecular level.
Read more

Cotton Candy

Summer would be incomplete without carnivals and bright, fleecy, sugary cotton candy. For a snack that’s nothing but sugar and air, there’s a surprising amount of physics and chemistry involved. Below are seven science-heavy facts about this feathery-light confection.

Fotm, cotton candy slide 1


Fotm, cotton candy slide 2


Fotm, cotton candy slide 3


Fotm, cotton candy slide 4


Fotm, cotton candy slide 5


Fotm, cotton candy slide 6


Fotm, cotton candy slide 7


Editor’s note: The original post stated that 1 ounce of cotton candy is 0.105 kilocalories, when in fact, it is 105 kilocalories, which is equivalent to 105 Calories. Thanks to our astute reader, Allison of the Internet for catching that! The post has now been updated (08-18-2015 10:06 p.m. PST)


Alice PhungAbout the author: Alice Phung once had her sights set on an English degree, but eventually switched over to chemistry and hasn’t looked back since.

Read more by Alice Phung


Alton Brown’s Jet Cream Ice Cream

Because you are currently reading a blog about science and food, there is a high probability that you have seen or at least heard of Alton Brown: host of Good Eats and about five other Food Network television shows. There is also a significant probability that you’re a mega-fan of Alton Brown, and if so, that’s something you and I have in common. I have been watching the bespectacled nerd-chef (I say that admiringly) since I was thirteen, and he has largely inspired my food science endeavors. On March 19th I had the absolute pleasure of attending Alton Brown Live! The Incredible Inevitable Tour in Napa, California.

IMG_4475

Alton describes the show content as all the things he can’t do on TV, including stand-up comedy, live music, and most excitingly, showing off his insane kitchen inventions. Because even the thought of burning myself on MegaBake terrifies me, we’re going to work through the science behind his colder contraption: Jet Cream.

Making ice cream is usually a simple process. Once you have your cream mixture, it simply needs to be repeatedly cooled and agitated. If we simply froze ice cream base, we’d get huge ice crystals, which aren’t necessarily bad. Dessert shops like Blockheads and Chilly Ribbons sell “Snow Cream,” that results from shaving fine sheets from a block of frozen milk or cream. But if we want ice cream, as Alton clearly does, we must continually add air to the cream and disrupt the crystallization process to make tiny crystals that are barely perceivable on the tongue. That’s why ice cream is smooth and unctuous, while frozen milk is crisp and icy. Whether you’re shaking a container of cream surrounded by ice by hand or using an industrial ice cream machine, the goal is to keep ice crystals small.

Alton’s goal is no different. To make ice cream, all he needs to do is simultaneously freeze and agitate his chocolate cream. His Jet Cream machine is an extravagant way to do a huge batch all at once, and in less than ten seconds. Rather than use ice and salt in a bason like pioneers did, or use liquid nitrogen like the modern gastronome, he uses compressed carbon dioxide via fire extinguisher.

When the fast-flying molecules of carbon dioxide gas are compressed into the extinguisher, they are stored at a very high pressure, typically 825 pounds per square inch. [1] A fire erupts on the stove, or you have a sudden urge for ice cream, so you pull the lever. The pressure is released; the gas flies out, and the nozzle and surrounding air become extremely cold, as tends to happen when a  gas suddenly expands from a high pressure to a low pressure. The change in temperature divided by the change in pressure makes a ratio (∆T/∆P) known as the Joule-Thomson coefficient.[2] The nozzle and surrounding air are chilled because the gas’ pressure change occurs too quickly for significant heat transfer to occur. For many gases at room temperature, as the CO2 in the extinguisher is, the ∆T/∆P ratio is positive, so a pressure drop is accompanied by a temperature drop. The molecules that were once speeding around inside the canister are now so low-energy that they form solid CO2, or dry ice. Dry ice is much, much colder than regular H2O ice because carbon dioxide freezes at -109 degrees Fahrenheit, while water freezes at 32 degrees. [3] Colder temperature = faster crystallization = quicker ice cream.

Photo Credit: David Allen, The Eater

Photo Credit: David Allen, The Eater

Now for the agitation: At the other end of Alton’s Jet Cream contraption is a typical water fire-extinguisher filled with chocolate cream. When this lever is pulled, a high-pressure spray of chocolate ensues. Between the two extinguishers are office water cooler jugs that act as the reaction chamber for the CO2 and cream. If the two levers are pulled exactly at the same time (synchronicity is very important in avoiding a catastrophic mess, stresses Alton), the blasts of cold and cream will collide in the coolers, providing the continual disturbance of the freezing process, as well as the incorporation of air, necessary to make tiny tasty ice crystals.

After plunking a scoop into a sugar cone and applying a generous coat of rainbow sprinkles, Alton hands off his creation to his volunteer assistant and asks if it is not the best ice cream he has ever had. Volunteer assistant replies that it is “So good.”

So there you have it. If you want ice cream that is “so good,” and you want a gallon of it fast, Jet Cream is the contraption for you.


Photo credits: instagram.com/altonbrown/

Photo credit: instagram.com/altonbrown/

References cited:

  1. “CO2 Fire Extinguishers.” Fire Extinguisher Guide. N.p., n.d. Web. 06 Apr. 2015.
  2. Joule Thomson Effect.” Wright State University – Department of Chemistry.  N.p., n.d. Web. 06 Apr. 2015
  3. “UCSB Science Line.” UCSB Science Line. N.p., n.d. Web. 06 Apr. 2015.

Elsbeth SitesAbout the author: Elsbeth Sites is pursuing her B.S. in Biology at UCLA. Her addiction to the Food Network has developed into a love of learning about the science behind food. Read more by Elsbeth Sites


BBQ Physics & Meat Flavors

2011-09-29-brisket-thumb

Ever put a slab of pork shoulder or beef brisket on the smoker for a BBQ, only to eventually hit “The Plateau”? Physicist Dr. Greg Blonder has the explanation for why the temperature of these meats will rise steadily for a few hours before it inexplicably stops and stalls at several degrees lower than the ideal 190°F. Fortunately, his explanation also comes with a solution. Once that dilemma is solved, check out the science that makes meat so delicious.
Read more

Pizza Nanophysics & The Bacon Genome

pizzatossing

As we saw earlier this week, scientific progress can collide with the food world in some truly unexpected ways. Continuing this theme, pizza tossing helps nanophysicists design tiny motors, while pig genome research holds the key to tastier bacon. Read more

The Science of Champagne Bubbles

Photo credit: _FXR/Flickr

Photo credit: _FXR/Flickr

Toast the new year with a bottle of champagne! With its effervescent fizz, golden sparkle, and showy corking, it is the go-to celebratory drink. Read up on champagne making, bubble formation, and the mathematics behind bubble patterns, and get ready to show off some foodie knowledge at this winter’s new year’s party.


How It’s Made

A sparkling wine isn’t champagne unless it comes from its namesake region of France. The Champagne province in the northeast of France boasts ideal soil conditions which contribute to the grape quality, and thus the quality of the beverage that results from champagne winemaking.

Champagne undergoes a two-part fermentation process. The first fermentation results in a flat champagne wine. Next, yeast and sugar are added to this base, and the bottle is sealed. The yeast consume the sugar and produce alcohol along with about 10 grams of CO2 per liter of fluid [1].

Toward the end of production the bottle is opened, whereupon the yeast and about 80% of the CO2 are expelled from the bottle. It may seem that allowing such a large fraction of the CO2 to escape would be undoing the yeast’s hard work, but the remaining 20% in the fluid are enough to make 20 million bubbles in one champagne flute, each no larger than a millimeter in diameter [1]. The bottle is quickly corked once again, and is then ready to be sold.


The Pop

Photo credit: BitHead/Flickr

Photo credit: BitHead/Flickr

At 11:59 on December 31st, many will have a bottle in hand and will be anticipating the bang of the cork shooting out; this is caused by the buildup of pressure inside the bottle. Surprisingly, only 5% of the energy exerted during the bottle opening is the cork’s kinetic energy, that is, the energy of motion that would propel the cork into your uncle’s eye. The remaining 95% of the energy generates the popping sound’s shock wave. This wave causes a mushroom cloud-like pattern of CO2 that is released when the cork pops [3]. The white fog that rises from the bottle after the mushroom cloud is a mist of ethanol and water vapor, triggered by the sudden drop in gas temperature when the bottle pressure is rapidly released Because of the speed at which this occurs, there is no time for the energy transfer—heating—to occur. The result is adiabatic cooling. The gas temperature drops, causing the water vapor in the gas to condense [3].


The Bubbles

Natural Effervescence — Champagne fizz has a rather surprising source. It is caused by the presence of tiny cellulose fibers that cling to the glass by electrostatic forces. The fibers are deposited from the air or that have been left over after wiping the glass with a towel. Each fiber, about 100 micrometers long, develops an internal gas pocket as the glass is filled. These microfiber gas pockets are the bubble formation sites. To form a bubble, dissolved CO2 has to push through liquid molecules held together by very weak but abundant molecular interactions. The CO2 would not have enough energy to do this on its own, but the gas pockets held in the cellulose fibers lower the energy barrier and allow a bubble to form. CO2 continually deposits itself from the champagne into the bubble until it reaches about 10-50 micrometers [1], whereupon its buoyant force is so great that it detaches from the fiber and floats upward. A new bubble forms immediately in its place.

Artificial Nucleation — Because natural effervescence is very random and not easily controlled, glassmakers use a more reproducible way to generate bubbles. Glassmakers use a laser to engrave artificial nucleation sites at the bottom of the glass to make the effervescence pattern pleasing to the eye. They usually create no fewer than 20 scratches to create a ring shape, which produces a consistent column of rising bubbles.


Bubble Patterns

Bubbling patterns actually change over the time that the champagne is within the glass. The bubbles start out as strings that rise in pairs, then gradually transition to bubbles in groups of threes, and finally settle down in a clockwork pattern of regularly spaced individual bubbles. A team of physicists in the Champagne region of France have performed extensive research to figure out the science behind champagne fizz and the interesting patterns the bubble strings form.

The patterns are determined by the vibration rate of the gas trapped at the nucleation point and the growth rate of the bubbles outside. These factors are determined by  atmospheric pressure on the surface of the champagne, temperature, and the size of the nucleation point in the glass, among other factors. The Champagne team has arrived upon a complex equation to explain the differential patterns of bubble streams by relating bubble radius, oscillation frequency of the gas pocket, and the time interval between two successive bubbles [2]

R(Ti + 1) = Ro + Ecos(2πωFbTi + 1)

where Ro is the radius of the bubble just before release, and Ti is the time interval between two successive bubbles, ω is the ratio between the oscillation frequencies of the gas pocket and the bubble (Fb), and E is related to the interactions between the two systems [2].

Now that some of the mystery behind the sparkle and pop of champagne has been explained through science, opportunities to impress friends and strike up conversation present themselves at the next big occasion. Break out a timer and graph paper; observe one nucleation point on a glass and measure the transition time from two to three bubble patterns. Someone is bound to ask what the stop watch is for.


References

  1. “Bubbles and Flow Patterns in Champagne.”  American Scientist. N.p., n.d. Web. 19 Dec. 2013.
  2. Liger-Belair, Gerard. “Period Adding Route in Sparkling Bubbles.” Physical Review 72 (2005): n. pag. Web.
  3. Boyle, Alan. “The Science of Champagne Bubbles Up for Again For News Year’s Eve.” NBC News. N.p., 31 Dec. 2012.

Elsbeth SitesAbout the author: Elsbeth Sites is pursuing her B.S. in Biology at UCLA. Her addiction to the Food Network has developed into a love of learning about the science behind food.

Read more by Elsbeth Sites


Spherification Potluck

There are times when gourmet edges more towards the laboratory than the kitchen; spherification is one of those times. In this culinary technique, liquids are transformed into globular semisolid gels thanks to a hydrocolloid gum extracted from seaweed. When these gel-encased balls are broken, the liquid contents gush out, akin to biting down on mochi or a Gushers candy. In theory, almost any liquid can be spherified, so the possibilities are endless. Ever wanted to eat plum juice caviar, spherical crème brûlée, or mojito spheres? With food-grade sodium alginate, calcium solution, and some creativity, it’s possible.

At the Spherification Potluck last month, graduate students Liz Roth-Johnson and Kendra Nyberg delved into the process on the molecular level. Gelation is made possible through the interaction between alginate and calcium ions. Alginate is a long, negatively charged, noodle-like molecule. When mixed into a liquid, alginate floats about freely, its elongated structure creating a thick, jelly-like consistency. Calcium ions are single calcium atoms with two positive charges, enabling each ion to link together two alginate molecules. Many calcium-linked alginate molecules gives rise to a more solid structure—the gel skin that encases a gooey center.

SpherificationLecture

Liz (left) and Kendra (right) explain the nuts and bolts of spherification.

Spherification - Options

Students brought a variety of beverages, sauces, and condiments to the potluck.

Attendees at the student event opted for items found in kitchen pantries and grocery store shelves, such as pomegranate molasses, rose water, coffee drinks, milk tea, sodas, guava nectar, and hot sauce.

In the first attempt at spherification, coffee was mixed with the sodium alginate to produce a rather thick goop. Plopping globs of this dense solution into the calcium chloride baths gave comical results, as the mixture adamantly refused to form any shape remotely resembling a sphere. Some blobs even broke upon removal from the calcium chloride baths.

CoffeeSpherification

Students prepare an alginate solution (left) and attempt to create spherified coffee (right)

Milk tea and Jarritos orange soda gave the best results in terms of shape and stability. Initially, the center of the milk tea spheres was thicker than expected, yielding a much chewier texture than bargained for. Minimizing incubation time in the calcium chloride solution managed to fix this halfway, somewhat decreasing the thickness of the gel casing. A quick search also revealed that our recipe used twice the sodium alginate other spherification recipes called for. If less alginate was added to the milk tea or orange soda, the spheres would have definitely been gooier.

Spherification - Jarritos sphere

A student shows off a fairly successful attempt at spherified orange soda.

The most difficult to work with was Tapatio, and not just because of the spicy fumes that emanated from the mixing bowl. Hot sauce is acidic, meaning it is full of positively charged hydrogen ions. Mixing it with alginate neutralizes the negative charges, hampering the interaction between alginate and calcium. No alginate-calcium interaction, no cross-link formation, no gel. Dropping the Tapatio-alginate mixture into calcium chloride resulted in nothing more than dissolved Tapatio swirling around in solution.

Spherification encompasses a high degree of flexibility. Besides the gamut of foods that can be used, there are also technical alterations—the ratio of liquid to sodium alginate in the pre-sphere goop; the concentration of the calcium chloride solution; the amount of time the spheres are left sitting in the calcium solution. And this is only the direct method. Other variations on this technique include reverse and frozen reverse spherification. With spherification kits readily available online, why not try spherifying your own recipe? Share your spherification adventures with us in the comments below!

10 More Things You Should Know About Pie

It’s summer. Berries and stone fruits abound, and so the season of pies continues. And we continue to think deeply about the science of pie. There has been intense interest in pies these past few months: first at the Science of Pie event; next at the World Science Festival’s Scientific Kitchen workshop at Pie Corps in New York; and most recently the New York Times Pie Issue. But we believe you can never know too much about pie. Here are 10 more things we think you should know…

WSFPieScience1

The World Science Festival’s Science of Pie workshop featured Amy Rowat with Pie Corps’ Cheryl and Felipa and special guest Bill Yosses, White House Pastry Chef and mastermind behind some of the best pies that Barack Obama has ever tasted. Here Cheryl, Felipa, and Bill dish out apple pie for the workshop participants.

WSFPieScience2

Science of Pie workshop participants deeply engaged in the science (and eating!) of pie.

1. A bit of high school chemistry goes a long way when baking pies.
The ideal gas law (PV=nRT) tells us that the volume of an air pocket gets bigger with increasing temperature. In the oven, molecules get more energy and start moving faster and faster, causing air pockets to get bigger and bigger; this can result in an inflated pie that collapses once you cut into it. At the same time, apples lose water, most of which gets converted to steam. Consider that a water molecule takes up about 1700 times more volume in the gas phase than in the liquid phase: if your crust were completely impermeable to water and all the steam got trapped inside, your pie would become much larger than your oven! Luckily much of that steam can escape through the crust and through steam vents. (This is also a good reason to be sure to avoid air pockets when you lay your crust into your pie tin!)

2. There is an art to cutting your fruit for a pie filling.
The way you cut your fruit is important. Smaller pieces of fruit will cook more quickly, but they also tend to lose more liquid since they have a higher surface-area-to-volume ratio. The geometry of your fruit pieces is also important for packing the filling into your pie. After placing your fruit slices into the center of the pie, pat them down to make sure they all like flat. This will create a pie with a lovely cross-section of layered fruits and, more importantly, will help to avoid air pockets that can expand in the oven.

3. Sometimes the best pie is a day-old pie.
Temperature is important for pie texture. Eating your pie the day after you bake it allows plenty of time for the pie to cool down and the filling to “set”. Because molecules flow more quickly past each other at higher temperatures, hot pie filling straight from the oven will be more runny; as the pie filling cools, starchy molecules like cornstarch and flour spend more time interacting with each other. As the pie cools, the pectin molecules of your fruit also spend more time interacting with each other. This results in a more solid, gel-like filling that will take longer to seep out of the pie when it is cut and served on a plate.

4. Think of butter as a gas.
Butter is really just a bunch of teeny tiny water droplets dispersed in a matrix of fat. In the oven, these water droplets convert from liquid to gas. This means that the chunks of butter you can see in your dough are really just big pockets of air waiting to happen. More air = flakier crust! While butters with the highest butterfat content are generally synonymous with the highest quality butter, when it comes to baking pie a slightly lower fat content, and higher water content, may be a good thing.

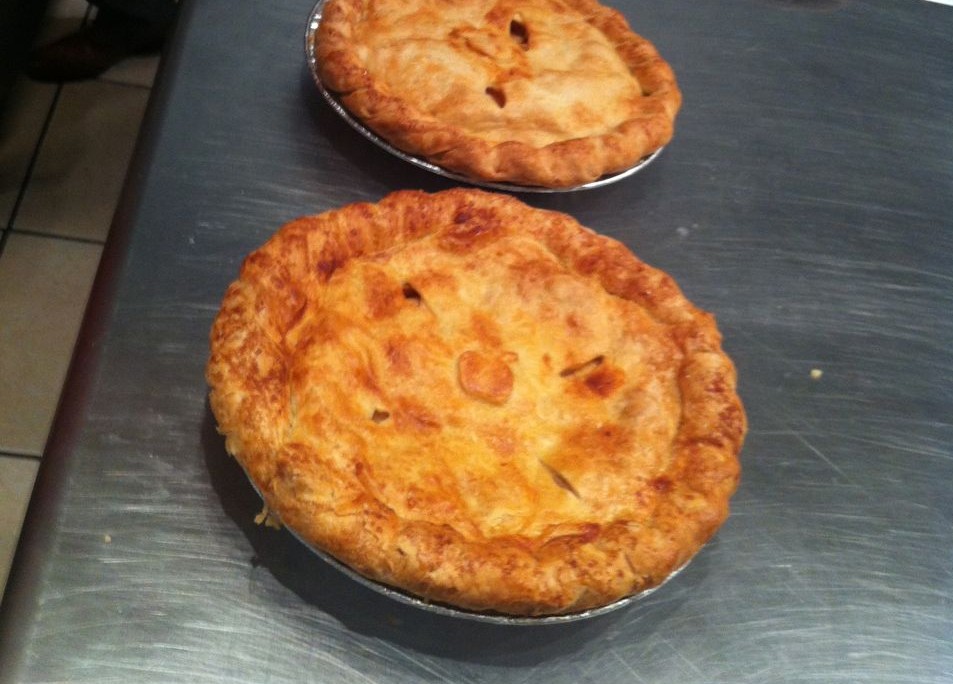
5. Wash with egg for a darker, more delicious pie crust.
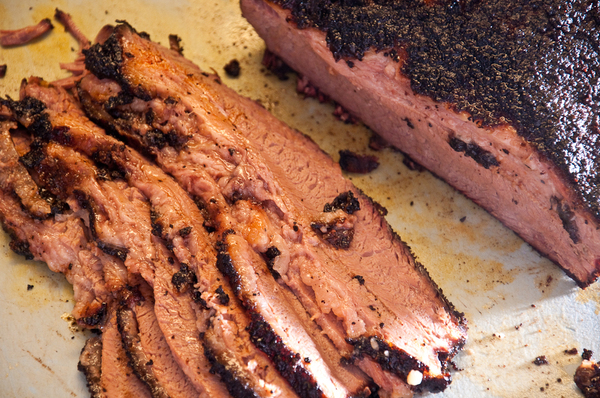
All those lovely color and flavor molecules in a nicely browned pie crust are the result of the Maillard reaction, a chemical reaction that occurs between amino acids, which comprise proteins, and sugar molecules like lactose or glucose. Brushing an egg (protein) on your pie crust before baking is a great way to add extra color and flavor. For extra browning, mix some heavy cream into your egg wash (more protein plus lots of lactose).

WSFPieScience3

Look at all those Maillard reactions!

6. Turn up the heat!
Maillard reactions happen faster at higher temperatures. Keep your oven hot (375F or so) to brown your pie that extra bit more. Another strategy is to start off at 400F, then turn down the temperature to 350F.

7. Bake your pie in parts.
A major challenge in baking pie comes from its complexity: you’ve got a crust that should be brown and crisp together with a filling that largely contains water. When contending with fruit pie fillings, one strategy is to prebake the bottom crust to help prevent it from becoming soggy. In this process of “blind baking,” don’t forget to prick holes in the bottom of your crust so the water vapor can escape. Filling your pie crust with pie weights or dried beans during this process can also help prevent layers of your wanton bottom crust from puffing up. Pie master Bill Yosses suggests taking this sequential baking process an extra step further: after the bottom crust has baked, it can be stitched into the sides of a crust using extra dough to “glue” the bottom to the sides. In the spirit of experimentation, this could be an interesting new method to try.

8. Create a pie crust with your “perfect” texture.
Typical attributes of a “perfect” pie crust include: flaky, tender, brown, and a little crispy. While the optimal texture of a pie crust is a deeply subjective and personal matter, here is a rough guide to how you can tune your pie crust texture simply by considering how you work your fat into your flour. For taste, color, and texture, we prefer butter, but shortening or lard can also be used.

  1. You want your fat to be solid when working it into the flour. Remember those little chunks of fat will become pockets of air in your crust! In a liquid form, it would coat the flour too evenly, resulting in a less flaky crust.
  2. Because butter melts around 30–32 degrees Celsius (86–90F), it can be tricky to make sure it remains solid while you work it with your hands (about 35 degrees Celsius or 95F). Prior to making your dough, cut your butter into small 1 x 1 cm cubes and place in the freezer for about 10-15 minutes.
  3. For a crust that has more form and larger flaky holes, work your very cold butter into the flour until you have a distribution of butter pieces with various sizes: some should appear the size of peas, others the size of almonds. When you work your butter in to achieve these sizes of chunks, much of the butter will get worked in so the rest of the dough will appear as coarse wet sand.
  4. For a tender and flaky crust you need a decent coating of fat around your flour. To achieve this, try the two-step method: (i) Divide your butter in half: cut one half into small cubes, and keep the remaining half in stick form. Place both halves in the freezer to ensure they are very cold. (ii) Work the stick of very cold butter into your flour by grating it in with a coarse grater. Work in thoroughly with your hands until the mixture has the texture of a coarse sand. (iii) Add the remaining half of your butter in cubes and work in with your hands until the largest pieces are about the size of peas. The theory here is that completely coating the flour in oil helps create a more “tender” crust.
  5. If you want to avoid getting your hands messy, or want to minimize heating of your butter, use a pastry cutter, or two knives held side by side, to work the butter into your flour.

9. Different types of flour create different types of pie crust.
What flour is the best flour for pie crust? This is a contentious question that has a variety of answers depending on personal preference, but the type of flour you use can have a major effect on the final texture of your crust. The protein content of flour, based on the type of wheat the flour was made from, will affect the extent of gluten formation in your dough. While springy networks of gluten proteins are great for chewy breads (bread flour has particularly high protein content), they can make pie crust dense and tough. Flours with lower protein content, such as pastry flour or cake flour, will create less extensive gluten networks and can produce a more tender crust. However, the pie crust ultimately needs to be formed into a dough, which can make it a challenge to work with a fragile dough that can result when using a low-protein content flour.

10. Almond extract tastes great in a fruit pie.
What more can we say? Nuts and fruit taste great together! A bit of almond extract is a delicious complement to apples and apricots alike.

AppleFoodPairing

And it’s not just almonds—lots of fruits and nuts go great with apples. This food pairing map from www.foodpairing.com is full of interesting flavor combinations.


Amy RowatAbout the author: Amy Rowat is a professor at UCLA. She began experimenting with food as a toddler and continues to research soft biological matter in the lab and kitchen.

Read more by Amy Rowat