Tag Archive for: experiment

Anyone Can Be a Kitchen Scientist

If anyone can cook, then anyone can do science! (Photo credit: Pixar)

If anyone can cook, then anyone can do science! (Photo credit: Pixar)

“Anyone can cook!” declared Chef Auguste Gusteau in the classic animated film Ratatouille. We’ll go a step further: with a little cooking know-how and access to a kitchen anyone can do science. Each spring the students of the Science & Food undergraduate course prove us right as they research and experiment their way toward apple pie enlightenment.

But you don’t have to be a student in our course to be a savvy kitchen scientist. One of our younger readers, Vincent, recently won his local seventh grade science fair by carefully crafting and conducting his own kitchen experiment. By baking cookies with different temperatures of light (reduced fat) butter, Vincent determined that frozen butter creates a chewier cookie than melted butter. His scientifically proven chewy chocolate chip cookie recipe appears at the end of the article.

Vincent’s project is a great example of a successful kitchen experiment. For those of you who are avid kitchen experimenters or are thinking of dipping a toe into the world of kitchen science, we’ve summarized the key features of Vincent’s project that will help make any (kitchen) science experiment a success.

Vincent’s winning science fair project.

Vincent’s winning science fair project.

A close-up of Vincent’s project. Note the number of cookies baked for each butter condition.

A close-up of Vincent’s project. Note the number of cookies baked for each butter condition.

Keys to a successful (kitchen) experiment

A questionScientific research has to start somewhere, and it almost always starts with a thought-provoking question. Why is the sky blue? Why do apples fall from trees? In this case Vincent wanted to know how the temperature of butter affects the chewiness of chocolate chip cookies.

A testable hypothesis – Once researchers have a question in mind, they need to come up with a testable hypothesis. The key word here is testable. Having a testable hypothesis guides researchers as they design effective experimental procedures. Based on a bit of background research and a dash of reasoning, Vincent hypothesized that cookie chewiness would be directly proportional to the temperature of the butter (hotter butter = chewier cookie). Vincent knew he could directly test his hypothesis by baking cookies with different butter temperatures and having a panel of tasters rate the chewiness of each cookie.

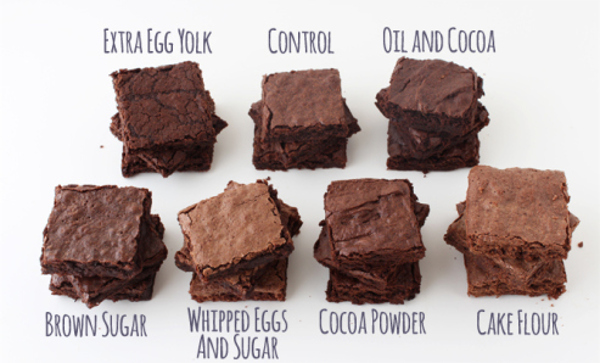
A carefully controlled experiment – When designing an experiment, it’s crucial to only change one variable, or component, at a time. Vincent was careful to only test one factor—butter temperature—and keep everything else in the experiment constant.

A large enough sample sizeOnce you’ve perfected your experimental design, repeat, repeat, repeat! Mistakes happen. And even the most thoughtfully executed experiments can go haywire because of factors beyond our control. Ovens have hot spots. Humidity can change the moisture of dough. To help avoid these potential pitfalls, Vincent made eight cookies at each butter temperature and had five different taste-testers rate the cookies.

A thoughtful analysis of the results – At the end of it all, what good is a bunch of data if it doesn’t actually mean anything useful? Based on his taste test, Vincent found that frozen butter produced the chewiest cookies, the exact opposite of his hypothesis! Like a true scientist, Vincent discounted his original hypothesis and offered up some pretty insightful ideas to explain his observations:

“The cookies with melted light butter were the least chewy, almost crunchy. I think this happened because, since there was more moisture in the batter with the melted butter, the cookies spread out more and got flat, exposing more surface area. This caused more water to evaporate quickly.”

A follow-up experimentThe work of a scientist is never done. Answering one question inevitably opens the doors to many more. As for Vincent, he’ll likely be back in the kitchen repeating his experiment with regular butter instead of light butter. “Doing this again,” he wrote in his report, “would not be a problem at all since I love baking and eating cookies!”

Do you experiment in the kitchen?
Write to us at scienceandfooducla (at) gmail (dot) com and tell us about your best kitchen experiment. We’ll feature our favorite feats of kitchen science on the site!


Vincent’s Scientifically-Tested Chewy Chocolate Chip Cookies
Adapted from Mel’s Kitchen Café

Ingredients

1 cup light butter, frozen and cut into cubes
1 cup granulated sugar
1 cup packed light brown sugar
3 large eggs
1 teaspoon salt
1 teaspoon vanilla
1 1/2 teaspoons baking soda
3 1/2 cups flour
2 cups chocolate chips


Directions

Preheat oven to 350 degrees. Cream butter and both sugars together until well mixed. Add eggs and mix for 2-3 minutes, until the batter is light in color. Add salt, vanilla, baking soda and mix. Add flour and chocolate chips together and mix until combined.

Drop cookie batter by rounded tablespoon onto parchment paper or silpat lined baking sheets and bake for 10 minutes until lightly golden around edges but still soft in the center.


Liz Roth-JohnsonAbout the author: Liz Roth-Johnson earned her Ph.D. in Molecular Biology at UCLA. If she’s not in the lab, you can usually find her experimenting in the kitchen.

Read more by Liz Roth-Johnson


Brownie Hacks & Cookie Engineering

brownie-comparison-relish

Get ready for the holidays! Check out these helpful guides to engineering your perfect brownies and cookies. Read more

Homemade Ice Cream

Phase transitions—transformations from one state of matter to another—are ubiquitous in food and cooking. Butter’s phase transition from a solid to a liquid results in flaky pie crusts, while water’s phase transition from a liquid to a gas can be used to steam vegetables. There are various ways to manipulate these phase transitions, such as by altering temperature, pressure, or salt content. In this classic home experiment, we will make ice cream by using salt to alter the phase behavior of water.


Objectives

  • Understand how solutes (salt) affect the phase behavior of a solvent (water).
  • Use freezing point depression to make a batch of amazing ice cream.


Materials

  • 1 cup cream
  • 1/2 cup sugar
  • 200 grams ice
  • Kosher salt
  • 1 quart Ziploc bag
  • 1 gallon Ziploc bag
  • Thermometer
  • Scale


Part 1: Use salt to lower the melting point of ice

To successfully freeze ice cream without the help of a freezer, we need a way to efficiently transfer heat out of the ice cream. Liquid water is much better than solid ice at transferring heat, so an ice-water bath will absorb heat from our ice cream better than solid ice. To effectively freeze ice cream, however, we need stable temperatures well below 0˚C.

How is it possible to have a mixture of water and ice at a temperature below 0˚C, water’s freezing point?

When you take ice straight out of the freezer, the ice will be roughly the same temperature as the freezer itself. The temperature in a home freezer is typically between 0˚C and -20˚C. As the ice sits out, it will absorb heat from its surroundings and slowly get warmer until it reaches 0˚C and begins to melt. Adding impurities like salt to ice will lower its melting point.  This means that salted ice will start melting at temperatures below 0˚C. As a result, a salty ice-water bath can stay liquid at temperatures well below 0˚C and efficiently freeze our ice cream. We refer to this phenomenon as “freezing point depression.”

We can use the freezing point depression equation to calculate how much a solvent’s freezing point will drop as a solute is added:

∆Tf = b · Kf  · i

∆T    Freezing point depression, defined as Tf of  pure solvent – Tf of solution.
K f        Cryoscopic constant of the solvent. This is an intrinsic property of the solvent.
b          Molar concentration of the solute: the number of moles of solute per kilogram of solvent.
i           Number of ion particles per molecule of solute, also known as the “Van’t Hoff factor”.
Salt is made up of one sodium ion and one chloride ion, so its Van’t Hoff factor is 2.

  1. Use the freezing point depression equation to calculate how much salt (our solute) is needed to decrease the freezing point of water (our solvent) from (a) 0˚C to -5˚C, (b) 0˚C to -10˚C, (c) 0˚C to -15˚C, and (d) 0˚C to -20˚C.
  2. Plot the magnitude of freezing point depression (ΔTf) versus salt concentration (Results from 1a, b, c, and d). Remember to use units!
  3. Based on your answer from 1d, calculate how many grams of salt are required to create a -20˚C freezing point depression for 200g of ice. This is the amount of salt you will use in Part 2.

Some useful values:
Freezing point (Tf) for pure water: 0˚C.
Cryoscopic constant (Kf) for water: 1.853 ˚C*kg/mol.
Molecular weight of salt (NaCl): 58.44 g/mol.

Click here to check your answers.


Part 2: Use freezing point depression to make ice cream

  1. Combine cream and sugar in the quart-size bag and mix well. Place this bag inside the gallon bag.
  2. Record the initial temperatures of the ice and the cream mixture.
  3. In the gallon bag, pack the ice around the quart-size bag, and then sprinkle the calculated amount of salt over the ice. Be careful that the salt does not fall into the cream mixture.
  4. Gently shake the bag until the cream mixture solidifies into ice cream.
  5. Record the final temperatures of the ice-salt-water mixture and the ice cream.
  6. Enjoy your homemade ice cream!


Questions

  • What was the final temperature of the ice cream? Did it end up below 0˚C? How does its temperature compare to the temperature of the salt-ice-water mixture?
  • What was the final temperature of the ice-salt-water mixture? Is warmer or colder than the ice you started with? How does the temperature compare to the freezing point depression you calculated in Part 1?


Discussion

In this experiment, we used salt to lower the freezing point of water. By adding salt to ice, we were able to achieve a salt-ice-water mixture that was able to freeze our ice cream.

Why does ice cream need temperatures colder than the freezing point of water in order to freeze?

When water freezes, it forms a well-ordered crystalline structure (an ice cube). This unique crystalline structure is what gives solid water a slightly lighter density. Although ice cream is a combination of  cream, sugar, and flavorings, it is still approximately 60% water. The remaining 40% is a mixture of sugar molecules, fat globules, and milk proteins [1]. This liquid mixture is emulsified: the water molecules are dispersed among sugar molecules, milk protein complexes, and large clusters of fat globules.. When this mixture is brought to the freezing temperature of water, the fats, proteins, and sugars hamper the freezing process by interrupting the formation of ordered crystal water structures. The ice cream mixture thus remains a liquid, requiring even colder temperatures below 0˚C to successfully solidify [2].

Structure of ice cream. (A) an electron micrograph of ice cream showing air bubbles, ice crystals, and the sugar solution [3]. Fat globules and milk proteins are not visible at this resolution. (B) Diagram of ice cream structure adapted from University of Guelph.

How did the salt in our experiment create a salt-ice-water mixture below 0˚C?

At 0˚C, ice and water are “at equilibrium” with each other. The total amount of water and ice remains relatively constant, but individual water molecules are constantly switching states: as some water molecules melt and become liquid, other water molecules freeze and become solid. Adding a solute like salt shifts this equilibrium. Solutes essentially “trap” water molecules in the liquid state, preventing them from readily switching back to the solid state. On a macroscopic scale, salt causes solid ice to melt faster and at temperatures below 0˚C, resulting in a salt-ice-water mixture below 0˚C. To get a better feel for how this process works at the molecular level, check out this interactive demonstration of how temperature and solutes affect the water-ice equilibrium.

Contrary to popular belief, the addition of salt to ice does not actually make the ice any colder!

The temperature that you recorded for the salt-ice-water mixture was probably colder than the temperature of the pure ice you started with. How is this possible? When you take the temperature of solid ice, you are not really measuring the temperature of the ice itself—you are measuring the average temperature of the ice, the air around the ice, and any water that has formed from the ice melting. The true temperature of the ice depends on the temperature  freezer it came from (typically between 0˚C and -20˚C) and the length of time the ice has spent out of the freezer.


Online Resources

  1. Interactive explanation of how temperature and solutes affect water-ice equilibrium
  2. “Ice Cream Structure” from University of Guelph

More from On Food and Cooking

  • McGee, Harold. On Food and Cooking. Scribner, 2004. (39–44).

References Cited

  1. Goff HD (1997) Colloidal aspects of ice cream—A review. International Dairy Journal 7: 363–373. doi:10.1016/S0958-6946(97)00040-X.
  2. Hartel RW (1996) Ice crystallization during the manufacture of ice cream. Trends in Food Science & Technology 7: 315–321. doi:10.1016/0924-2244(96)10033-9.
  3. Clarke C (2003) The physics of ice cream. Physics Education 38: 248–253. doi:10.1088/0031-9120/38/3/308.

Liz Roth-JohnsonAbout the author: Liz Roth-Johnson is a Ph.D. candidate in Molecular Biology at UCLA. If she’s not in the lab, you can usually find her experimenting in the kitchen.

Read more by Liz Roth-Johnson